Flex Pro Alignment: Door, Crosshair, IR Frame
← All Flex Pro troubleshooting
The software reports an open door when it is closed, the crosshair is misaligned, or infrared framing does not match engraving.
Disconnect power before disassembly or electrical testing. Turn off the engraving machine before removing the laser and disconnecting its cable, or removing and reinserting the TF card. Do not turn off the machine or remove the TF card during a firmware update.
¶ Door Closed but Alarmed
What you see: The Enclosure Door Is Closed, but the “Enclosure Door Open” Alarm Persists
Refer to the Flex Pro enclosure door limit switch troubleshooting video and follow the steps below one by one:
1) Close the Enclosure Door Again
Try closing the enclosure door again and check whether the alarm clears.
2) Manually Trigger the Switches
Press the two trigger points on the enclosure door by hand, as shown in Figure 105. Check whether the status indicator changes from red to green.
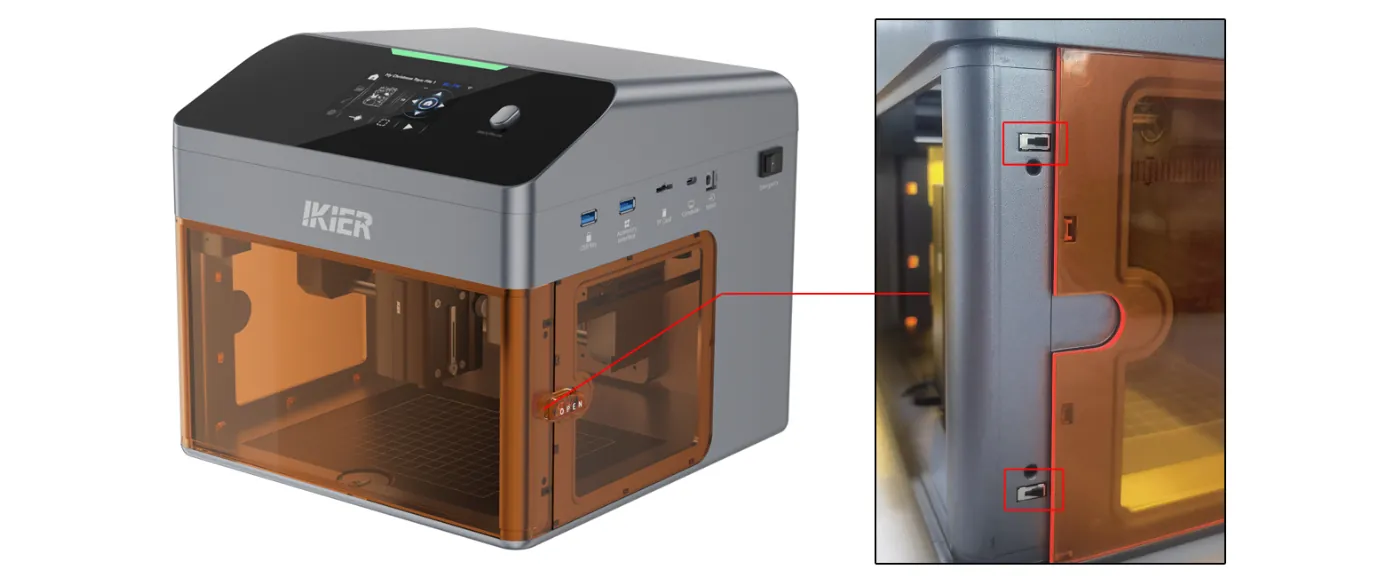
Figure 105
3) Check the Cable Connections
- Check the cable connections: Check whether the cables at the limit switch and the mainboard end are loose, as shown in Figure 106. Disconnect and reconnect them, then check whether the issue is resolved.
- Measure the cable voltage: Use a multimeter set to DC voltage mode to measure the voltage at the cable pins, as shown in Figure 107.
- Pins 1–2: 3.3 V
- Pins 2–3: 3.3 V
Refer to the Flex Pro enclosure door limit switch troubleshooting video for guidance on taking the measurements.
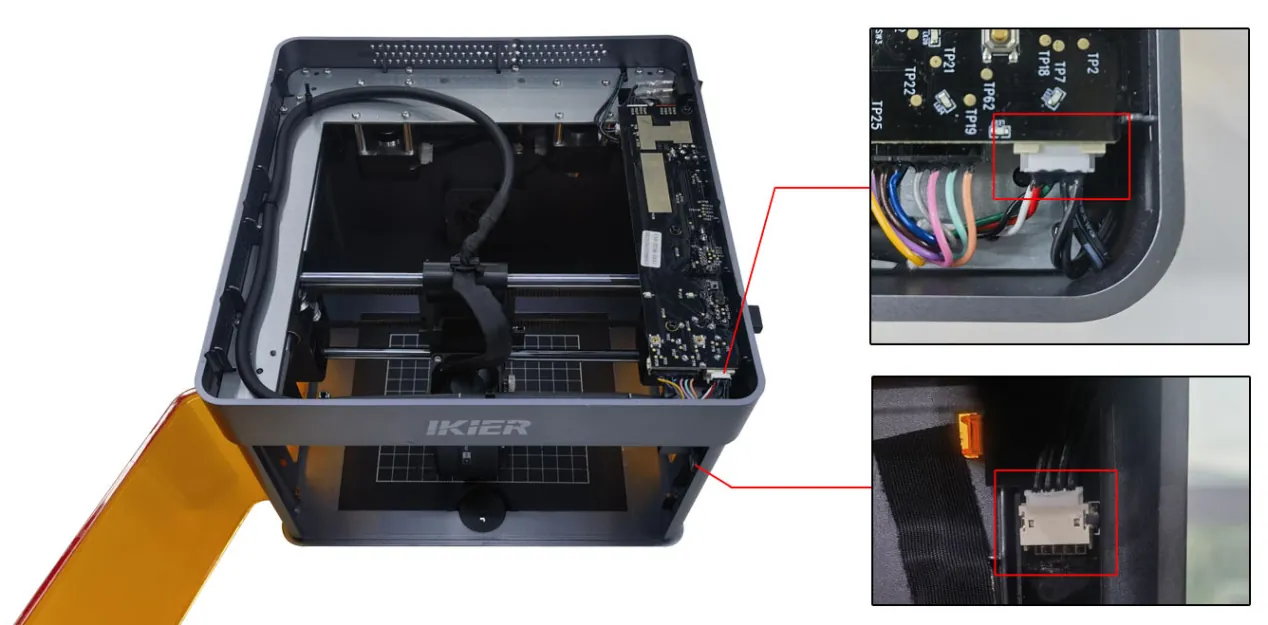
Figure 106
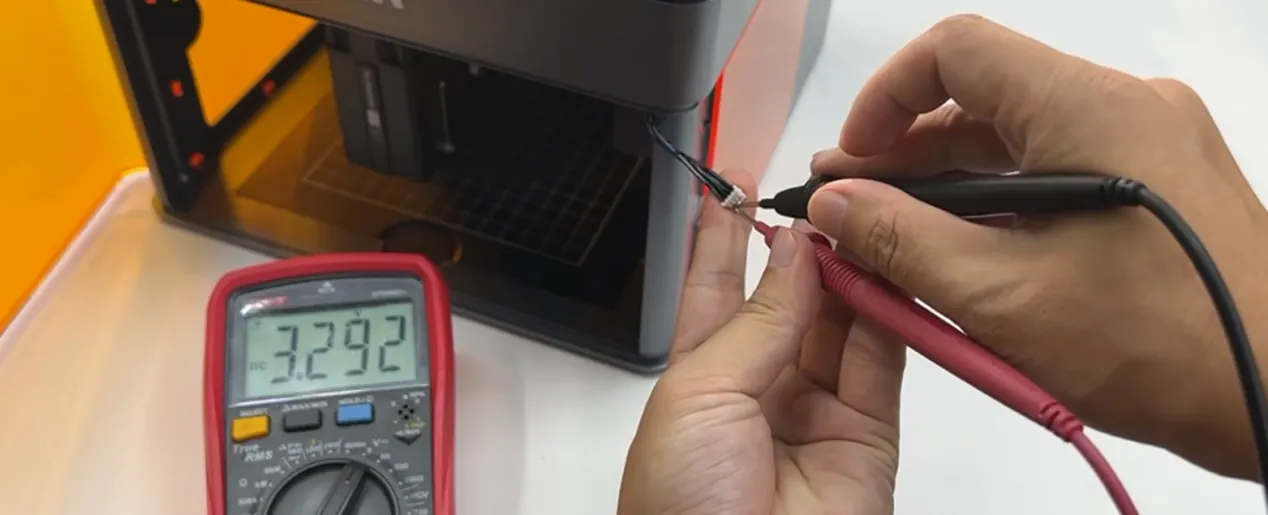
Figure 107
4) Restore Factory Settings
If the above steps do not resolve the issue, refer to the Flex Pro factory reset video and follow the steps below:
① AtomStack Studio
- Click Settings in the navigation bar and locate “Version:
V*.*.*” in the Settings window. - Click the version number seven or more times consecutively. “Serial Port Log” (Developer Mode) will appear in the menu bar.
- Click “Serial Port Log” to open the interface. A series of execution codes will appear in the code box.
- Click “Reset” in the bottom-right corner. If the code box indicates that the reset is complete and ends with “OK”, the reset has been completed successfully.
- Click “Close” in the top-right corner to exit the interface.
② LightBurn
Select the “Console” window, enter $RST=* in the code box, and click Send, as shown in Figure 108.
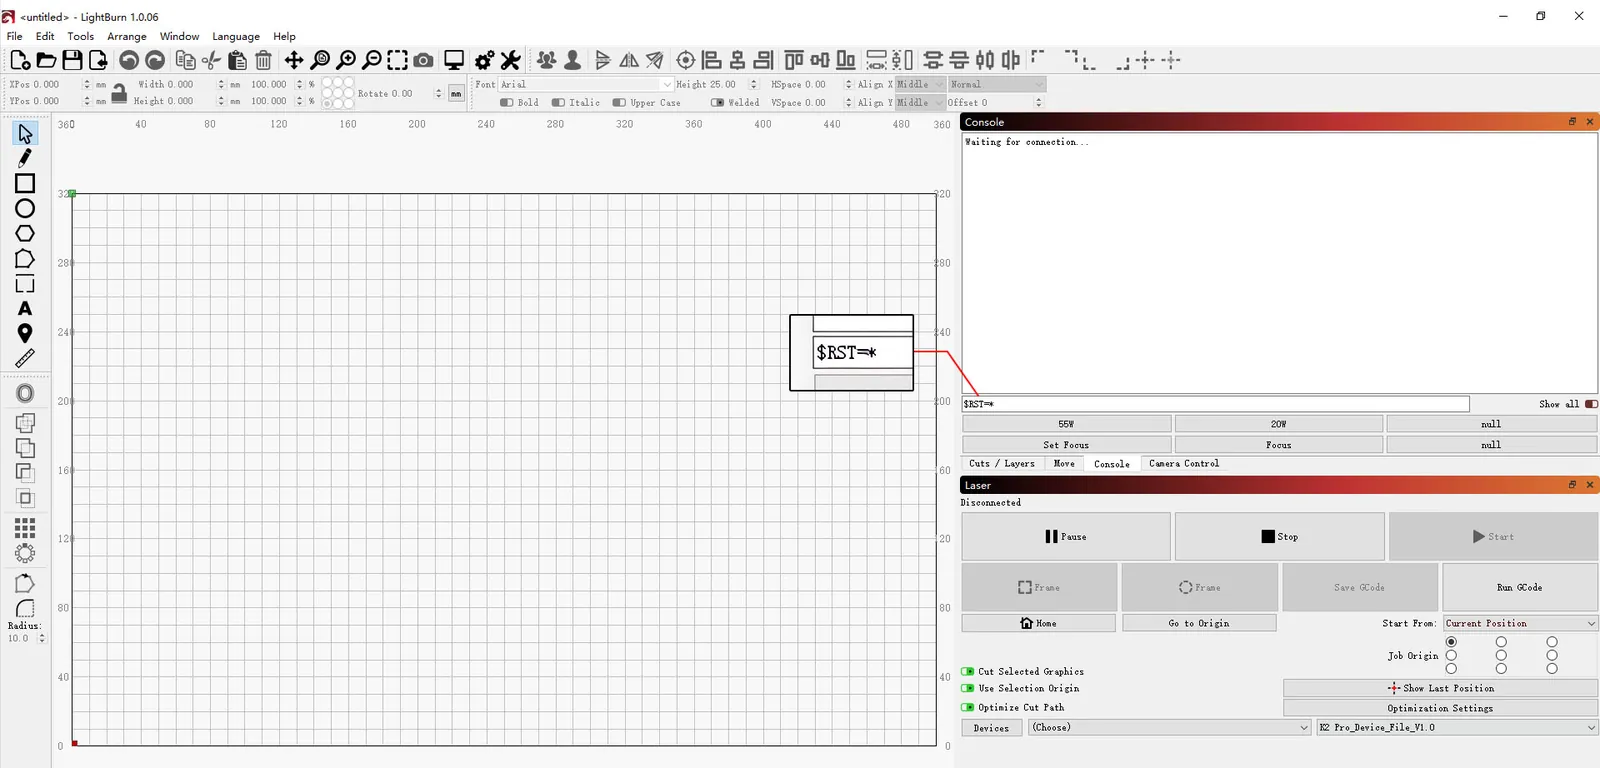
Figure 108
5) Contact Customer Support
If the above steps do not resolve the issue, please contact Customer Support and provide the following information:
- Troubleshooting video: Show the alarm status and the troubleshooting steps, including closing the door again and checking the cable connections.
- Photos of the fault: If you identify a faulty component or connection during troubleshooting, provide clear photos.
- Device Serial Number: Provide a photo of the Serial Number on the back of the enclosure (Figure 109).
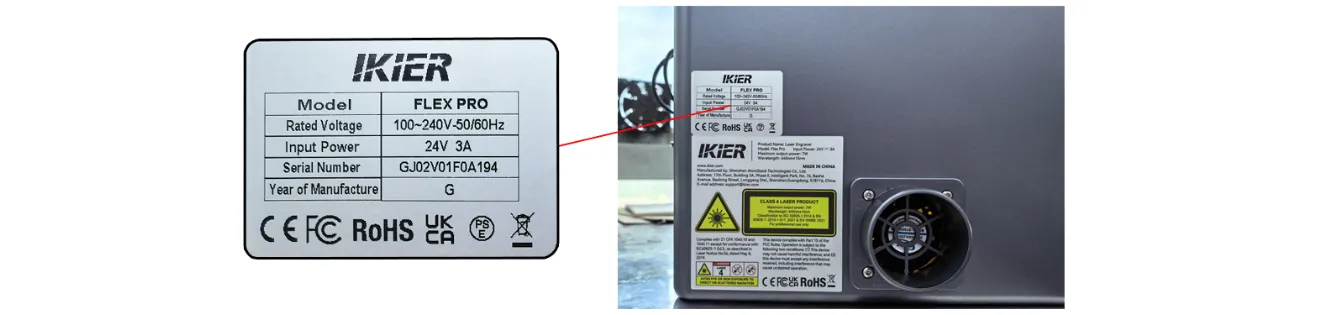
Figure 109
6) Component Replacement References
- To replace the mainboard, refer to the Flex Pro mainboard replacement video.
- To replace the enclosure door limit switch, refer to the Flex Pro enclosure door limit switch replacement video.
- To replace the mainboard connecting cable, refer to the Flex Pro mainboard connecting cable replacement video.
¶ Crosshair Misaligned
What you see: The Red Crosshair Position Does Not Align with the Laser Processing Point
Refer to the Flex Pro Infrared Laser Crosshair Calibration video and follow the steps below.
1) Calibration Steps Using Computer Software
① Home the Laser Engraver
After successfully connecting to the machine, home the laser engraver first to ensure the coordinates are reset to zero.
② Enter the Calibration Screen
- Open “Device Information” in the upper-right corner of the software and confirm that “Positioning Mode” is set to “Red Crosshair Positioning.”
- Click the “Calibrate” button next to “Red Crosshair Positioning Calibration” to enter the crosshair calibration screen.
③ Frame to Confirm the Working Area
Click “Frame” to confirm that the calibration pattern is within the engraving area.
④ Start Engraving
Click “Start.” The machine will engrave a cross-shaped pattern (“+”) as a calibration reference.
⑤ Align the Red Crosshair with the Engraved Cross
Follow the on-screen prompts and use the directional control buttons to move the laser head until the red crosshair is perfectly aligned with the engraved cross.
If the movement distance per step is too large, manually adjust the step size (the distance moved with each step) for more precise control.
⑥ Complete Calibration
Click “Finish.” The system will save the calibration results, completing the calibration process.
2) Calibration Steps Using the Mobile App
① Enter the Calibration Screen
Open the app's home screen and tap “Settings” in the upper-right corner or in the bottom menu bar to enter the device settings screen.
② Engrave the Cross
Tap “Red Crosshair Positioning Calibration.” On the pop-up screen titled “Mark Current Position,” tap the center of the circle. The machine will automatically engrave a cross-shaped mark as a calibration reference.
③ Move the Red Crosshair to Align with the Engraved Cross
After engraving is complete, follow the on-screen prompts and use the directional control buttons to move the laser head until the red crosshair is perfectly aligned with the engraved cross.
If the movement distance per step is too large, manually adjust the step size (the distance moved with each step) for more precise control.
④ Complete Calibration
Once the red crosshair is perfectly aligned with the engraved cross, tap “Finish.” The system will automatically save the calibration results, completing the calibration process.
Notes
If the above steps do not resolve the issue, refer to the Flex Pro factory reset video and follow the steps below:
① AtomStack Studio
- Click Settings in the navigation bar and locate “Version:
V*.*.*” in the Settings window. - Click the version number seven or more times consecutively. “Serial Port Log” (Developer Mode) will appear in the menu bar.
- Click “Serial Port Log” to open the interface. A series of execution codes will appear in the code box.
- Click “Reset” in the bottom-right corner. If the code box indicates that the reset is complete and ends with “OK”, the reset has been completed successfully.
- Click “Close” in the top-right corner to exit the interface.
② LightBurn
Select the “Console” window, enter $RST=* in the code box, and click Send, as shown in Figure 110.
Figure 110
¶ IR Framing Offset
What you see: The IR Laser Module’s Frame Position Does Not Match the Processing Position
Please follow the steps below to troubleshoot the issue one by one:
1) Calibrate the Red Crosshair
Refer to the section “The Red Crosshair Position Does Not Align with the Laser Processing Point” and follow the calibration instructions.
2) Test with Different Control Software
Make sure you are using the recommended software: AtomStack Studio or the genuine version of LightBurn. If you are currently using LightBurn, try engraving with AtomStack Studio and check whether the issue occurs again to rule out software version compatibility issues.
3) Restore Factory Settings
If the above steps do not resolve the issue, refer to the Flex Pro factory reset video and follow the steps below:
① AtomStack Studio
- Click Settings in the navigation bar and locate “Version:
V*.*.*” in the Settings window. - Click the version number seven or more times consecutively. “Serial Port Log” (Developer Mode) will appear in the menu bar.
- Click “Serial Port Log” to open the interface. A series of execution codes will appear in the code box.
- Click “Reset” in the bottom-right corner. If the code box indicates that the reset is complete and ends with “OK”, the reset has been completed successfully.
- Click “Close” in the top-right corner to exit the interface.
② LightBurn
Select the “Console” window, enter $RST=* in the code box, and click Send, as shown in Figure 111.
Figure 111
4) Contact Customer Support
If the above steps do not resolve the issue, please contact Customer Support and provide the following information:
- Troubleshooting video: Record the issue clearly.
- Troubleshooting steps performed: Describe the steps you have already taken.
- Device Serial Number: Provide a photo of the Serial Number on the back of the enclosure (Figure 112).
Figure 112