Flex Pro Materials: Gaps, Fumes, Fan Noise
← All Flex Pro troubleshooting
Lightweight material moves or has missing lines, lines or shapes do not close, fumes linger, the fan stops, or friction noise appears.
Disconnect power before disassembly or electrical testing. Turn off the engraving machine before removing the laser and disconnecting its cable, or removing and reinserting the TF card. Do not turn off the machine or remove the TF card during a firmware update.
¶ Gaps on Thin Stock
What you see: Missing Lines in the Engraved Pattern When Processing Thin, Lightweight Materials
Please follow the steps below to troubleshoot the issue one by one.
1) Secure All Four Corners of the Material
Four small magnets are included with the engraver. Use them to secure all four corners of the thin, lightweight material to the base plate to prevent it from shifting due to airflow from the fan during processing.
2) Ensure the Material Lies Flat
Check whether the material lies flat against the surface of the base plate. If it is warped or wrinkled, flatten it before processing.
3) Test with a Different Material
Replace the material with a wooden board or another heavier material. Perform an engraving test using the appropriate parameters and check whether missing lines or material shifting still occur.
4) Contact Customer Support
If none of the above steps resolves the issue, contact Customer Support and provide the following information:
- Video of the issue: The video must show the entire engraving process and the resulting engraving.
- Troubleshooting steps performed: Provide a description of the steps you have already tried.
- Serial Number photo: Provide a photo of the Serial Number label on the back of the enclosure, as shown in Figure 115.
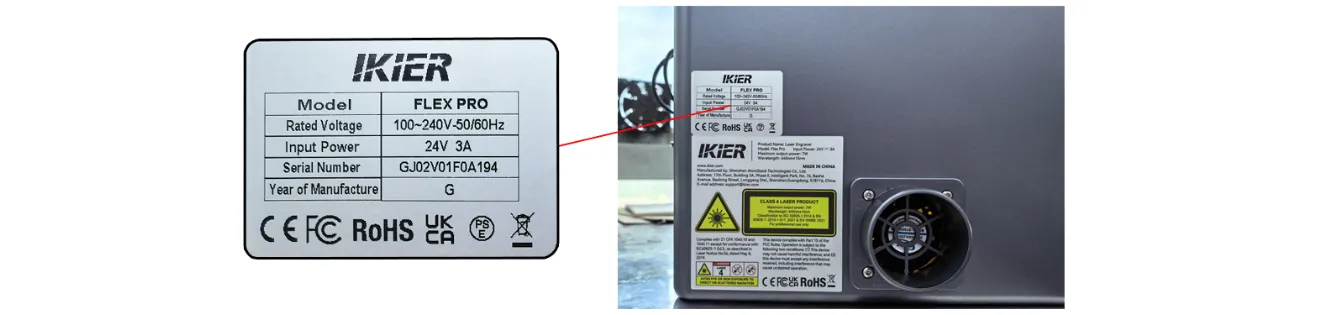
Figure 115
¶ Thin Stock Blown Around
What you see: Thin, Lightweight Materials Are Blown Around During Processing
Please follow the steps below to troubleshoot the issue one by one.
1) Secure All Four Corners of the Material
Four small magnets are included with the engraver. Use them to secure all four corners of the thin, lightweight material to the base plate to prevent it from shifting due to airflow from the fan during processing.
2) Ensure the Material Lies Flat
Check whether the material lies flat against the surface of the base plate. If it is warped or wrinkled, flatten it before processing.
3) Test with a Different Material
Replace the material with a wooden board or another heavier material. Perform an engraving test using the appropriate parameters and check whether missing lines or material shifting still occur.
4) Contact Customer Support
If none of the above steps resolves the issue, contact Customer Support and provide the following information:
- Video of the issue: The video must show the entire engraving process and the resulting engraving.
- Troubleshooting steps performed: Provide a description of the steps you have already tried.
- Serial Number photo: Provide a photo of the Serial Number label on the back of the enclosure, as shown in Figure 115.
Figure 116
¶ Lines Don't Close
What you see: Engraved Lines Do Not Connect Properly at Corners or Start/End Points (Open Lines)
Refer to the Flex Pro troubleshooting video for open lines at the start/end points or corners during engraving, and follow the steps below in order.
1) Check the Power and Speed Settings
Compare the current settings with the recommended parameter table to ensure they are correct. Try slightly increasing the power or reducing the speed, then check whether the lines connect properly.
2) Enable Constant Power Mode
Enable Constant Power mode in the software and test whether this resolves the issue.
3) Enable “Overcut”
If the lines fail to connect only at the final closing point, enable the Overcut function in the software and set the overscanning distance. Then test whether the issue is resolved, as shown in Figure 117.
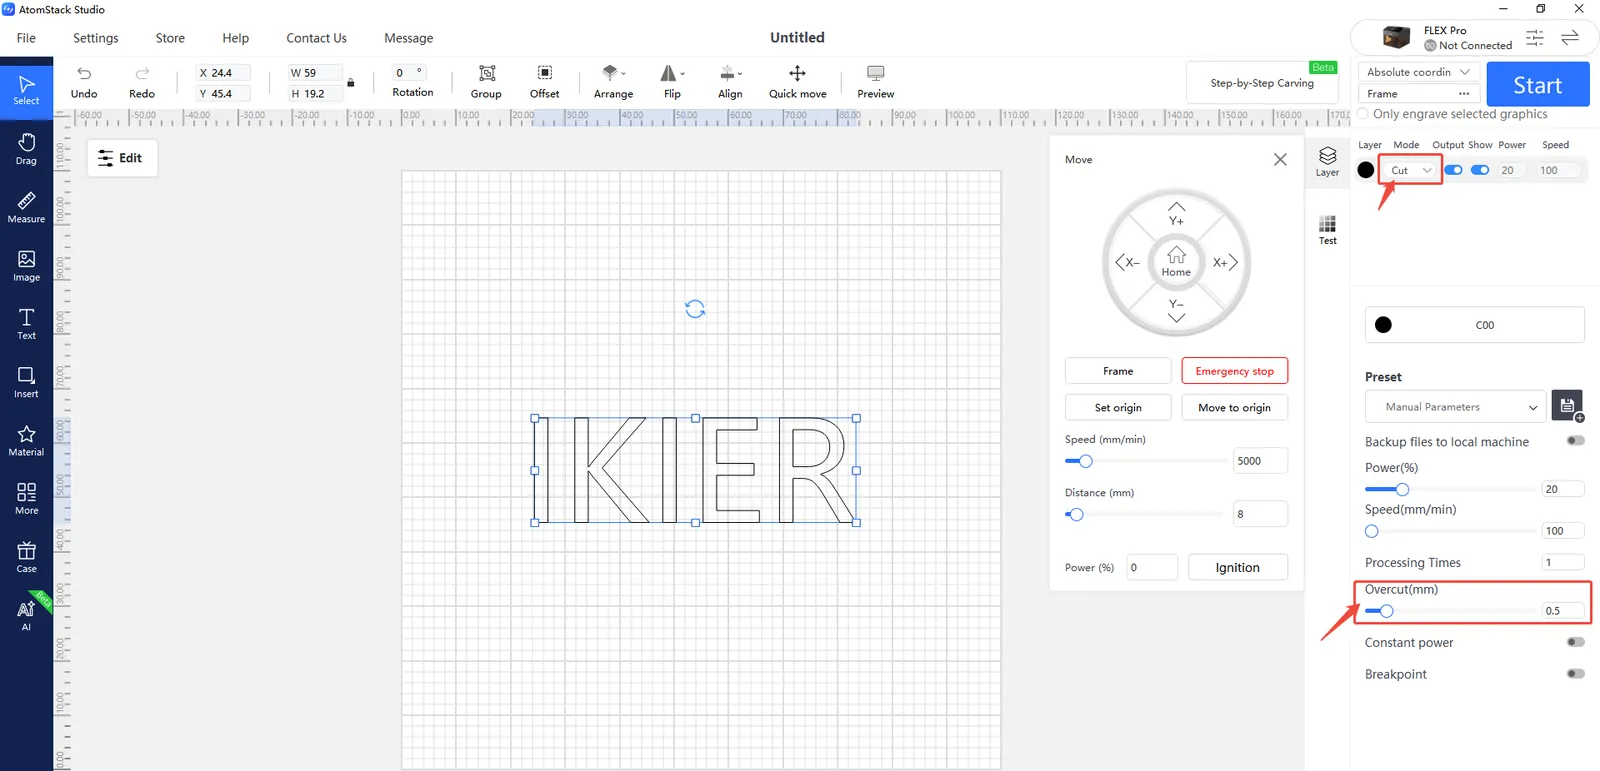
Figure 117
4) Adjust the Minimum Power Value
Open lines are often caused by the laser's minimum power value ($31) being set too low. Adjust it as follows.
① AtomStack Studio
- Open the Settings menu and click the software version number at least seven times to activate Developer Mode.
- Click Serial Port Log in the menu bar to open the console.
- Enter
$31=*in the input field and send the command. Replace * with a numerical value, increasing it gradually until the lines connect properly.
For example, if the lines remain open when $31 is set to 0, send $31=10. If the lines still do not connect, increase the value to $31=20, and continue increasing it until the issue is resolved.
② LightBurn
- Click Edit → Machine Settings and locate
$31. - Gradually increase its value, then click Write → OK to save the changes.
- Repeat this process, increasing the
$31value incrementally until the lines connect properly.
5) Restore Factory Settings
If none of the above steps resolves the issue, refer to the Flex Pro factory reset video and follow the steps below.
① AtomStack Studio
- Click Settings in the navigation bar and locate “Version:
V*.*.*” in the Settings window. - Click the version number seven or more times consecutively. “Serial Port Log” (Developer Mode) will appear in the menu bar.
- Click “Serial Port Log” to open the interface. A series of execution codes will appear in the code box.
- Click “Reset” in the bottom-right corner. If the code box indicates that the reset is complete and ends with “OK”, the reset has been completed successfully.
- Click “Close” in the top-right corner to exit the interface.
② LightBurn
Select the “Console” window, enter $RST=* in the code box, and click Send, as shown in Figure 118.
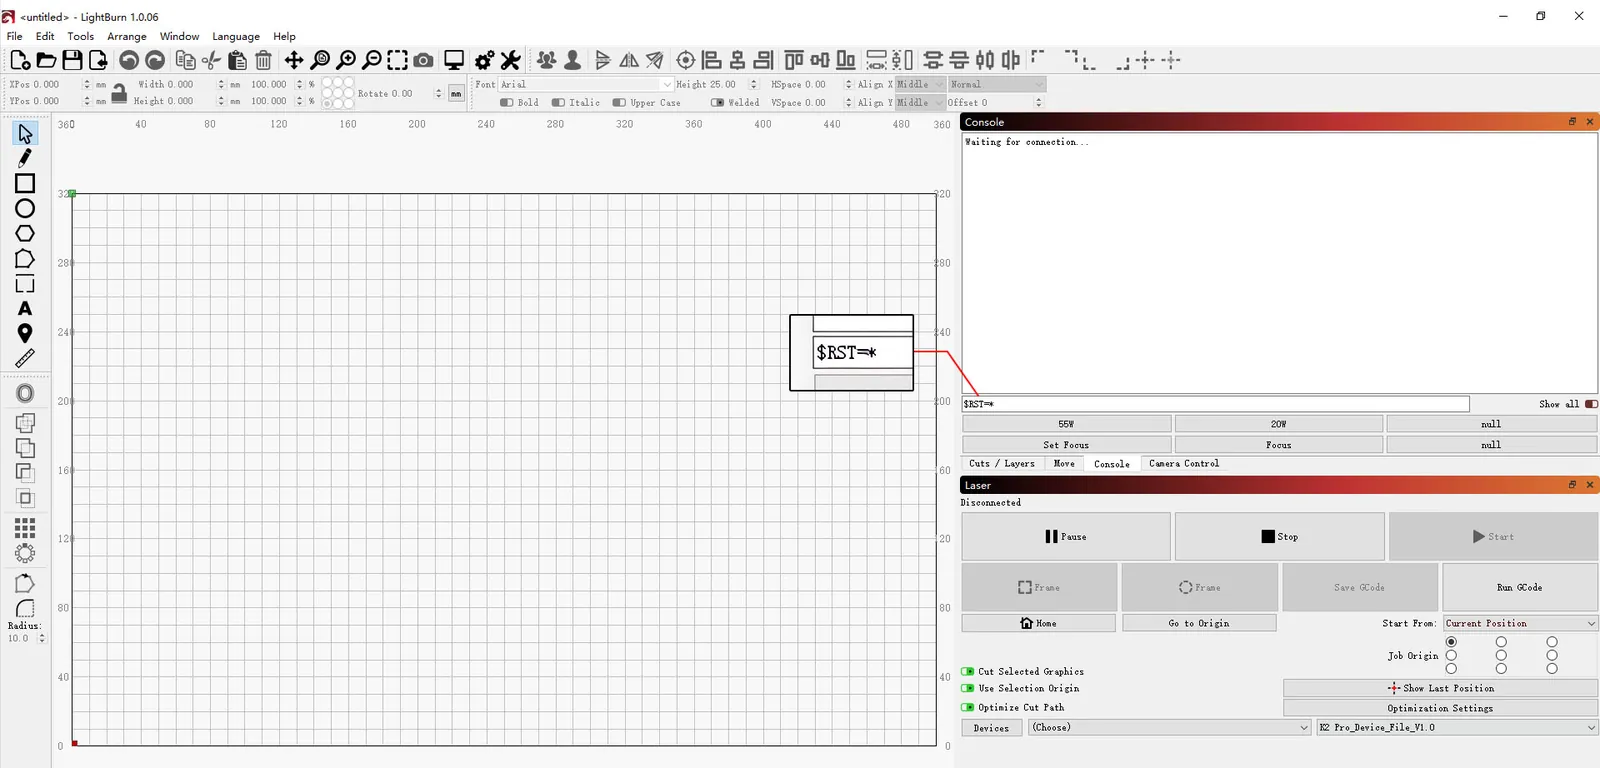
Figure 118
6) Contact Customer Support
If the issue persists after completing the above steps, please contact customer support and provide the following information:
Troubleshooting video: Clearly show the software operation steps, the engraving process, and the results.
Description of the steps already taken.
Photo of the Serial Number located on the back of the machine (see Figure 119).
Figure 119
¶ Shapes Don't Close
What you see: Circles or Squares Do Not Close Properly at Corners or Start/End Points During Engraving (Open Lines)
Refer to the Flex Pro troubleshooting video for open lines at the start/end points or corners during engraving, and follow the steps below in order.
1) Check the Power and Speed Settings
Compare the current settings with the recommended parameter table to ensure they are correct. Try slightly increasing the power or reducing the speed, then check whether the lines connect properly.
2) Enable Constant Power Mode
Enable Constant Power mode in the software and test whether this resolves the issue.
3) Enable “Overcut”
If the lines fail to connect only at the final closing point, enable the Overcut function in the software and set the overscanning distance. Then test whether the issue is resolved, as shown in Figure 120.
Figure 120
4) Adjust the Minimum Power Value
Open lines are often caused by the laser's minimum power value ($31) being set too low. Adjust it as follows.
① AtomStack Studio
- Open the Settings menu and click the software version number at least seven times to activate Developer Mode.
- Click Serial Port Log in the menu bar to open the console.
- Enter
$31=*in the input field and send the command. Replace * with a numerical value, increasing it gradually until the lines connect properly.
For example, if the lines remain open when $31 is set to 0, send $31=10. If the lines still do not connect, increase the value to $31=20, and continue increasing it until the issue is resolved.
② LightBurn
- Click Edit → Machine Settings and locate
$31. - Gradually increase its value, then click Write → OK to save the changes.
- Repeat this process, increasing the
$31value incrementally until the lines connect properly.
5) Restore Factory Settings
If none of the above steps resolves the issue, refer to the Flex Pro factory reset video and follow the steps below.
① AtomStack Studio
- Click Settings in the navigation bar and locate “Version:
V*.*.*” in the Settings window. - Click the version number seven or more times consecutively. “Serial Port Log” (Developer Mode) will appear in the menu bar.
- Click “Serial Port Log” to open the interface. A series of execution codes will appear in the code box.
- Click “Reset” in the bottom-right corner. If the code box indicates that the reset is complete and ends with “OK”, the reset has been completed successfully.
- Click “Close” in the top-right corner to exit the interface.
② LightBurn
Select the “Console” window, enter $RST=* in the code box, and click Send, as shown in Figure 121.
Figure 121
6) Contact Customer Support
If the issue persists after completing the above steps, please contact customer support and provide the following information:
Troubleshooting video: Clearly show the software operation steps, the engraving process, and the results.
Description of the steps already taken.
Photo of the Serial Number located on the back of the machine (see Figure 122).
Figure 122
¶ Fumes Not Exhausted
What you see: Smoke and Dust Inside the Enclosure Cannot Be Exhausted Promptly
If smoke is not being exhausted properly, refer to the Flex Pro exhaust fan troubleshooting video and follow the steps below to identify the issue.
1) Check the Enclosure Fan
- Check whether the fan is rotating
Observe whether the fan operates normally during engraving or cutting. If it does not, check whether the fan cable is securely connected to the mainboard. Unplug the cable and reconnect it to see whether the issue is resolved. If the problem persists, refer to the video and use an adapter to power the fan separately to test whether it operates normally.
- Check whether the fan blades are intact
If the fan is rotating, carefully inspect the blades for cracks, breaks, or other damage.
Note
Broken or damaged fan blades can significantly reduce exhaust performance and cause abnormal noise.
- Check whether dust has accumulated on the fan
If the blades are intact, check their surfaces for dust buildup. If necessary, refer to the Flex Pro enclosure maintenance video for cleaning instructions.
2) Check the Exhaust Hose
Make sure the exhaust hose is not bent or blocked and that the exhaust path is unobstructed.
3) Troubleshoot the Air Purifier
If an air purifier is connected, try disconnecting the exhaust hose from the purifier and directing the exhaust air outdoors. Check whether the exhaust performance improves.
- If exhaust performance returns to normal, the issue is likely with the air purifier, such as a clogged filter or equipment malfunction.
- If exhaust performance remains poor, continue checking the enclosure fan and exhaust hose.
4) Contact Customer Support
If none of the above steps resolves the issue, contact Customer Support and provide the following information:
- Video of the issue: Clearly show the fan's operating status, the exhaust hose condition, and the exhaust performance.
- Troubleshooting steps performed: Provide a description of the steps you have already tried.
- Serial Number photo: Provide a photo of the Serial Number label on the back of the enclosure, as shown in Figure 123.
Figure 123
5) Replacement Part References
- To replace the fan, refer to the Flex Pro exhaust fan troubleshooting video.
- To replace the mainboard, refer to the Flex Pro mainboard replacement video.
¶ Enclosure Fan Stopped
What you see: The Enclosure Fan Is Not Spinning
Refer to the Flex Pro exhaust fan troubleshooting video and follow the steps below to identify the issue.
1) Check Whether the Fan Cable Is Loose on the Mainboard
Turn off the engraver and open the top cover upward from inside the enclosure. Check whether the fan cable connected to the mainboard is loose. Unplug the cable and reconnect it, then test the fan again.
2) Test the Fan Using a Separate Power Supply
Refer to the video and use an adapter to power the fan separately. Check whether the fan operates normally.
- If the fan operates normally → The mainboard is faulty.
- If the fan still does not operate → The fan is faulty.
3) Contact Customer Support
- Video of the issue: Provide a clear video showing the fault.
- Troubleshooting results: Record the separate power supply test on video and send it to Customer Support.
- Serial Number photo: Provide a photo of the Serial Number label on the back of the enclosure, as shown in Figure 124.
Figure 124
4) Replacement Part References
- To replace the mainboard, refer to the Flex Pro mainboard replacement video.
- To replace the fan, refer to the Flex Pro exhaust fan troubleshooting video.
¶ Friction or Brown Powder
What you see: Unusual Friction Noise During Engraving or Brown Powder Inside the Enclosure
Please follow the steps below to troubleshoot the issue.
1) Check the Timing Belt Idler Pulleys
Turn off the engraver and open the enclosure door. Inspect each idler pulley along the timing belt path and make sure the belt has not slipped out of any pulley groove.
2) Check the Motor Timing Pulleys
Turn off the machine, open the enclosure door and top cover, and check whether the motor timing pulleys are aligned with the timing belts, with no angular misalignment or sideways tension, as shown in Figure 125.
If any misalignment is found, loosen the pulley screws, adjust the pulleys to the correct positions, and retighten the screws.
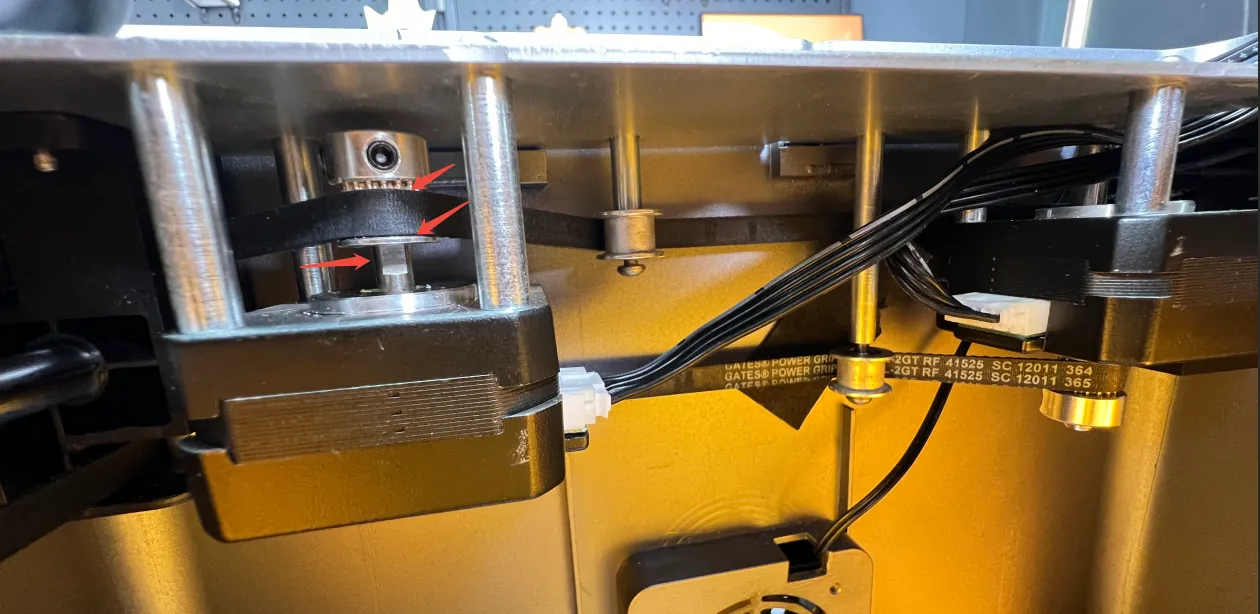
Figure 125
3) Check the Linear Shaft Surfaces
Open the top cover and inspect the surfaces of all three linear shafts for signs of friction or wear. Also check whether the lubricant has dried out or is insufficient. If necessary, refer to the Flex Pro enclosure maintenance video for cleaning and lubrication instructions.
4) Contact Customer Support
If none of the above steps resolves the issue, or if you identify a problem that you cannot fix yourself, contact Customer Support and provide the following information:
- Video of the issue: Clearly show the fault symptoms.
- Troubleshooting steps performed: Provide a description of the steps you have already tried.
- Clear photos of the faulty components: Provide clear photos showing the affected parts.
- Serial Number photo: Provide a photo of the Serial Number label on the back of the enclosure, as shown in Figure 126.
Figure 126