Flex Pro Power: No Power, PC, App, TF Card
← All Flex Pro troubleshooting
The machine will not power on or connect, shows a red indicator or storage warning, cannot read a TF card, or reports a missing USB Key.
Disconnect power before disassembly or electrical testing. Turn off the engraving machine before removing the laser and disconnecting its cable, or removing and reinserting the TF card. Do not turn off the machine or remove the TF card during a firmware update.
¶ Won't Power On
What you see: Machine Will Not Power On
Refer to the Flex Pro troubleshooting video for power-on failures. Check the status of the top indicator light and follow the steps below in order.
1) Indicator Light Is Red (Alarm State)
① Check the USB Key (Software Alarm: USB Key Not Connected)
Check whether the USB Key is inserted, as shown in Figure 8. If it is already inserted, gently move the USB Key and observe whether the indicator light turns green.
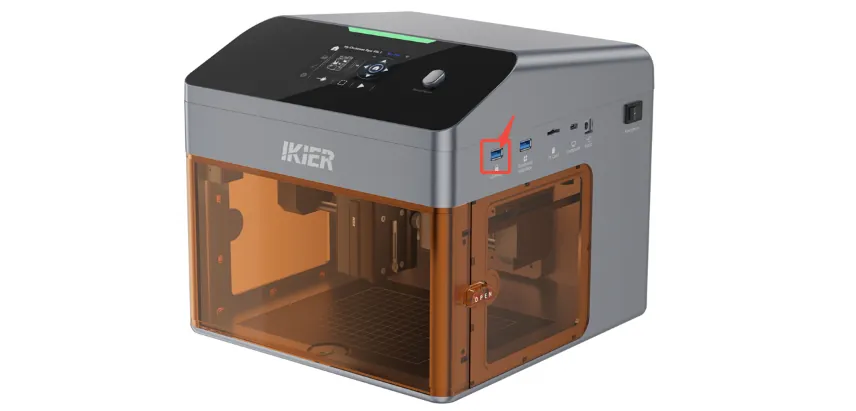
Figure 8
② Check Whether the Top Cover Is Closed Properly
The mainboard is equipped with a cover-open detection switch, as shown in Figure 9. If the top cover is not fully closed, the machine will remain in an alarm state and cannot operate normally. The software will display “Top Cover Open.”
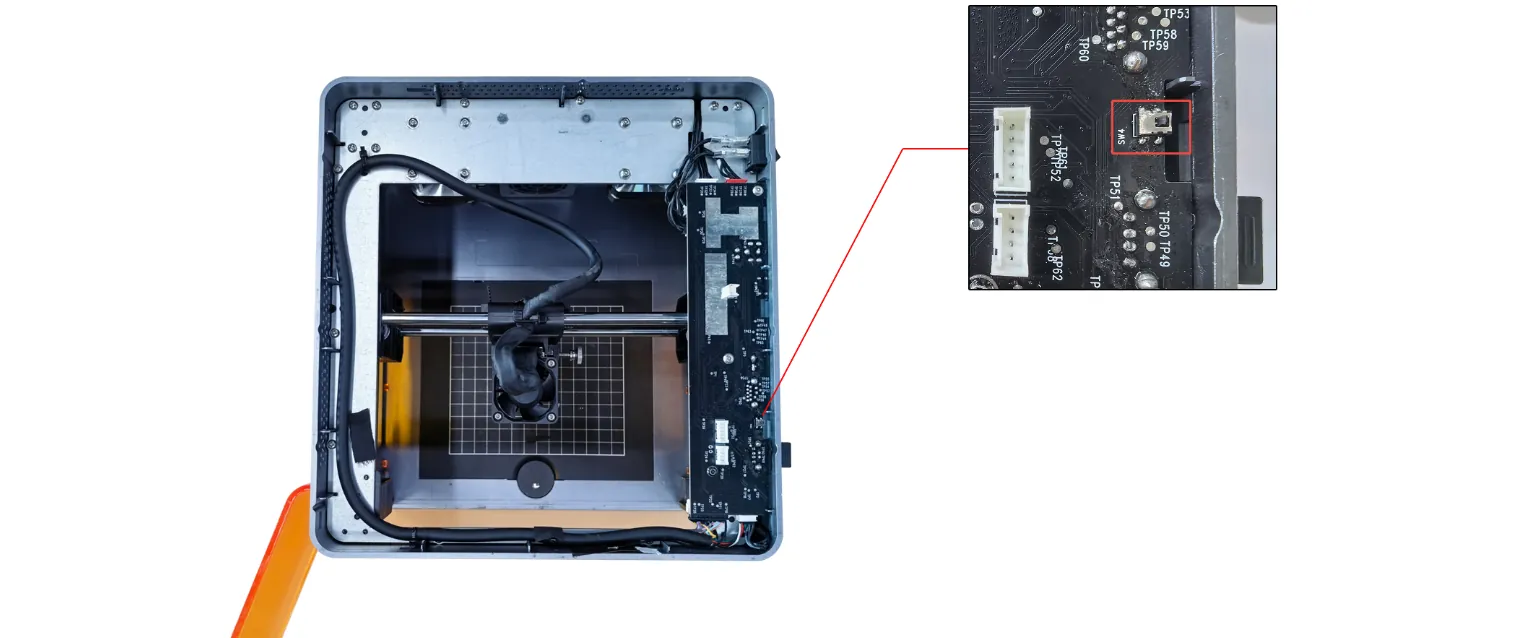
Figure 9
③ Check the Enclosure Door (Software Alarm: Enclosure Opened Abnormally)
Check whether the enclosure door is fully closed and close it again if necessary. If the issue persists, manually press the two trigger points on the door, as shown in Figure 10, and observe whether the status indicator turns green.
- If the indicator turns green after pressing: The enclosure door was not fully closed. Check for any obstructions.
- If the alarm persists after pressing: Check whether the cables connecting the door limit switch to the mainboard are loose. Disconnect and reconnect them if necessary.
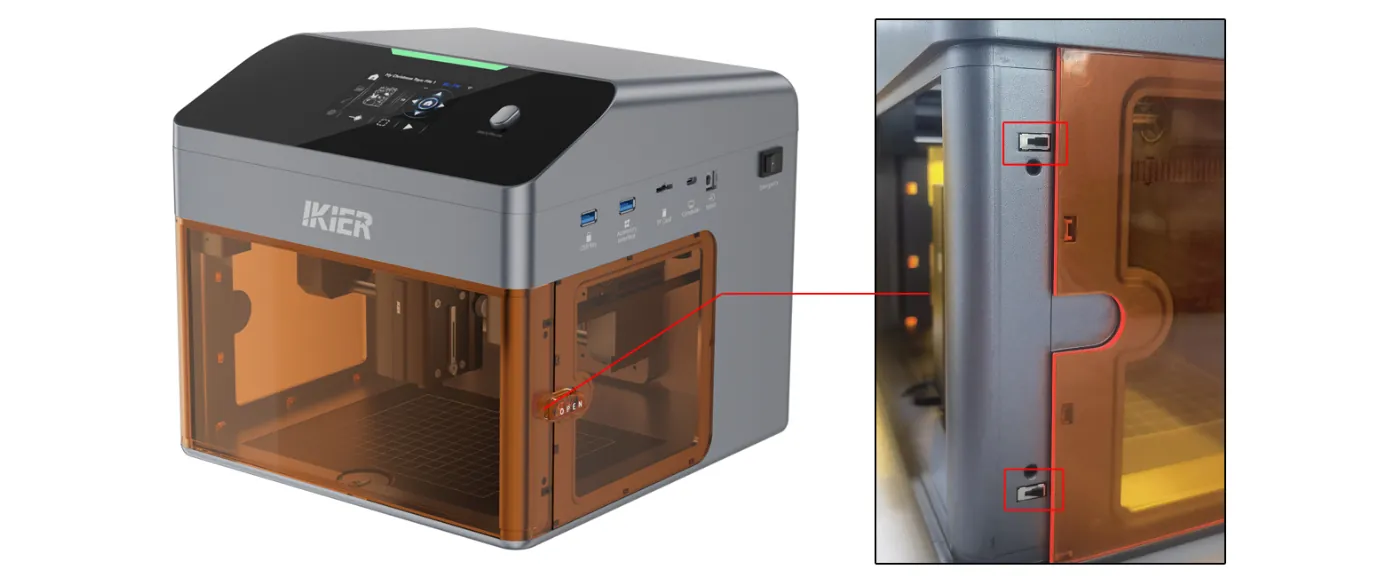
Figure 10
④ Check the Laser Module Position
Manually move the laser module to the center of the enclosure and check whether the indicator light turns green.
⑤ Restore Factory Settings
If none of the above steps resolves the issue, refer to the Flex Pro factory reset video and follow the instructions below.
- AtomStack Studio
- Click “Settings” in the navigation bar and locate “Version:
V*..” in the Settings window. - Click the version number more than seven times consecutively. “Serial Port Log” (Developer Mode) will appear in the menu bar.
- Click “Serial Port Log” to open the interface. A series of execution commands will appear in the code window.
- Click “Reset” in the lower-right corner of the interface. If the console reports that the reset is complete and the final output is “OK,” the reset has been completed successfully.
- Click “Close” in the upper-right corner to exit the interface.
- Click “Settings” in the navigation bar and locate “Version:
- LightBurn
Select the “Console” window, enter $RST=* in the command field, and click Send, as shown in Figure 11.
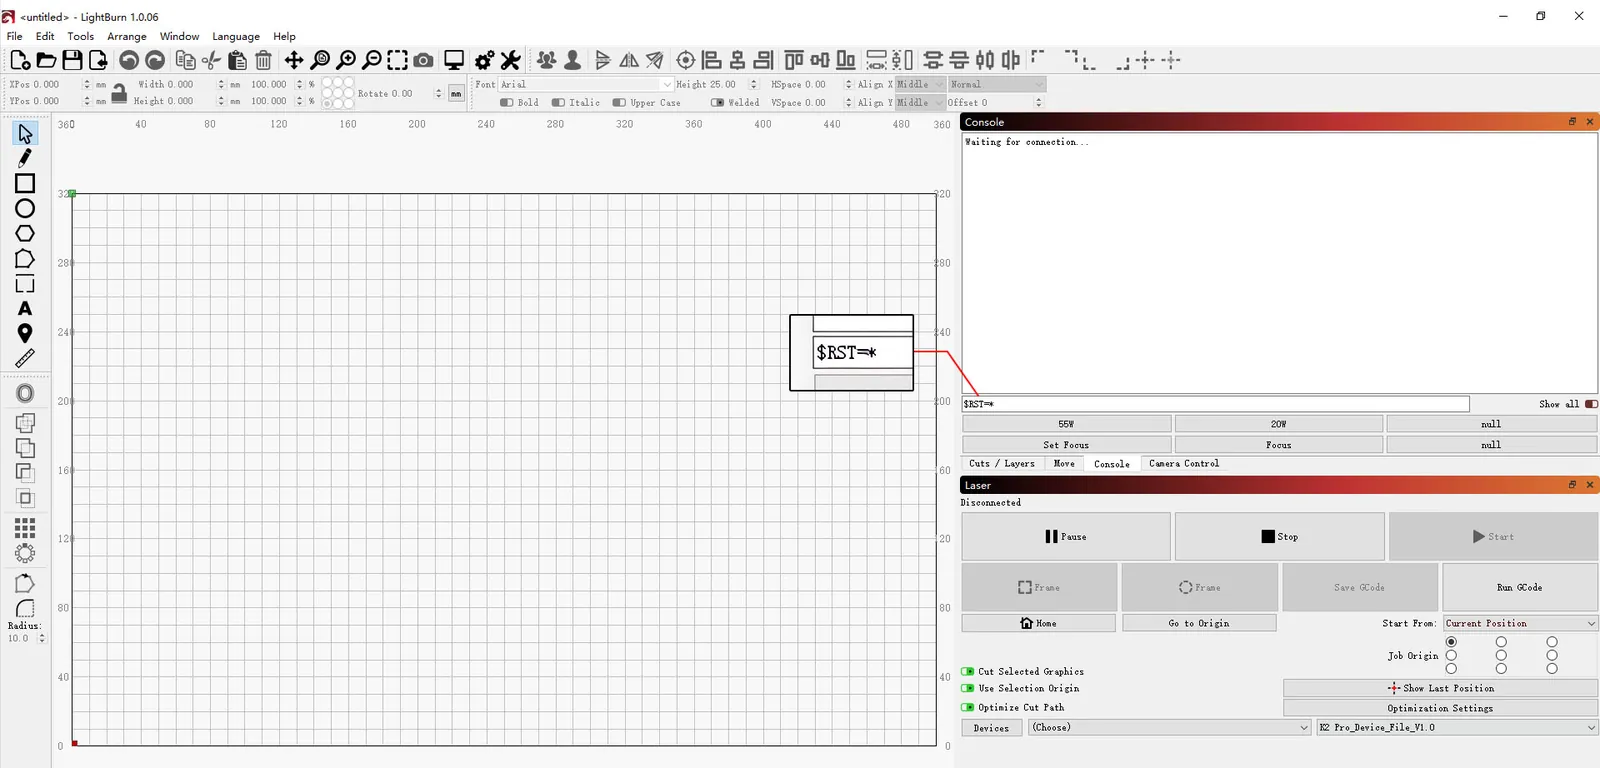
Figure 11
2) Indicator Light Is Off (Mainboard Not Started)
Check the mainboard power indicator: Open the enclosure door and check whether the mainboard power indicator in the upper-right area is illuminated, as shown in Figure 12.
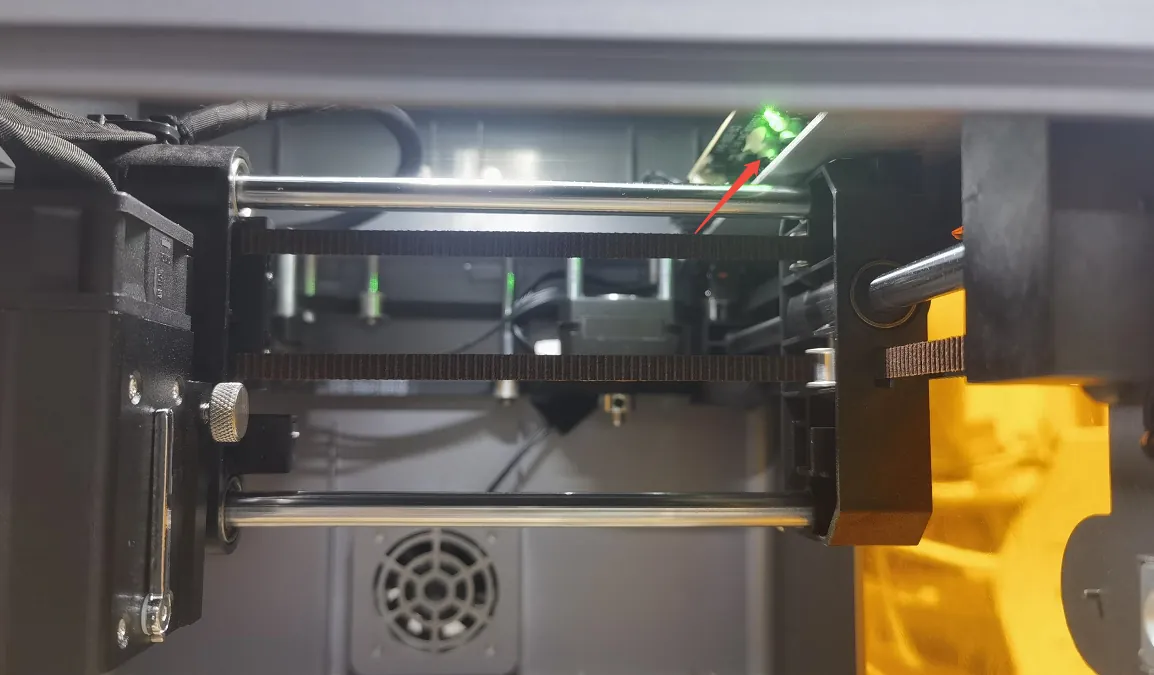
Figure 12
① Indicator Light Is On: If you do not hear a beep, the mainboard firmware may be malfunctioning. Contact Customer Support to obtain the firmware flashing file.
② Indicator Light Is Off: The power adapter or power switch may be faulty.
- Power Adapter Check: Set a multimeter to DC voltage mode and measure the adapter's output voltage to check whether it is 24 V, as shown in Figure 13. If you do not have a multimeter, briefly touch the two power-switch wires on the mainboard together and check for a spark to help determine whether the adapter is faulty. If the adapter is confirmed to be faulty, provide Customer Support with a photo of the Serial Number on the back of the enclosure so that a replacement part can be arranged.
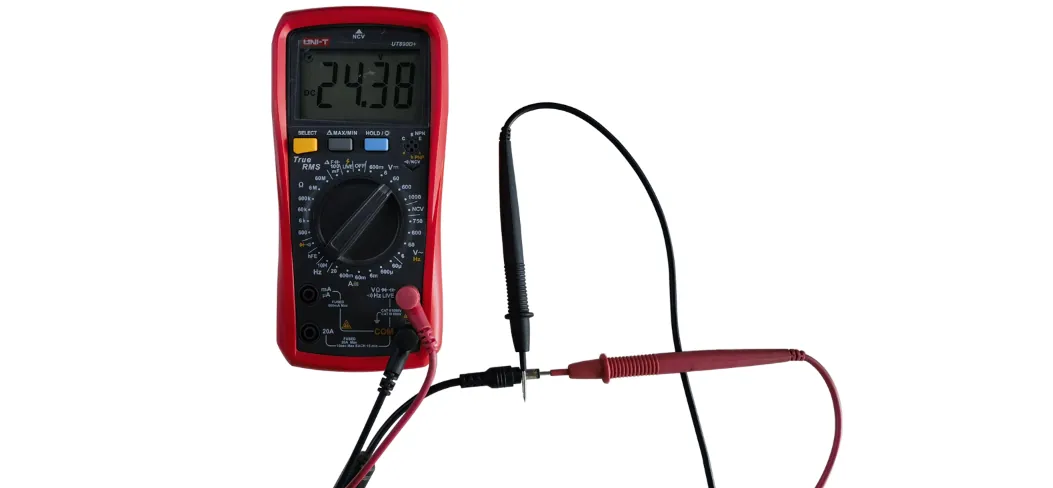
Figure 13
- Power Switch Check: Open the enclosure door and push the top cover upward from the inside to remove it. Disconnect the two wires from the power switch in the upper-right corner, as shown in Figure 14. Slide the plastic protective sleeve downward to expose the two metal terminals, then connect the terminals directly, as shown in Figure 15. Connect the power supply and check whether the machine powers on normally. If the machine powers on after the terminals are connected directly, contact Customer Support and provide the troubleshooting results and a photo of the Serial Number to arrange for a replacement part.
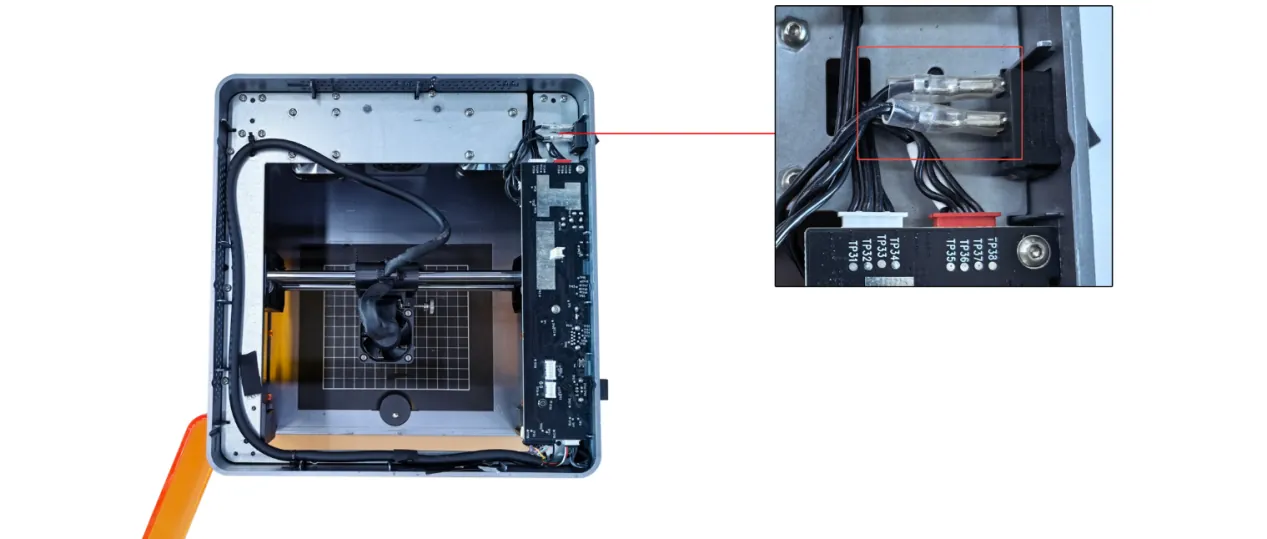
Figure 14
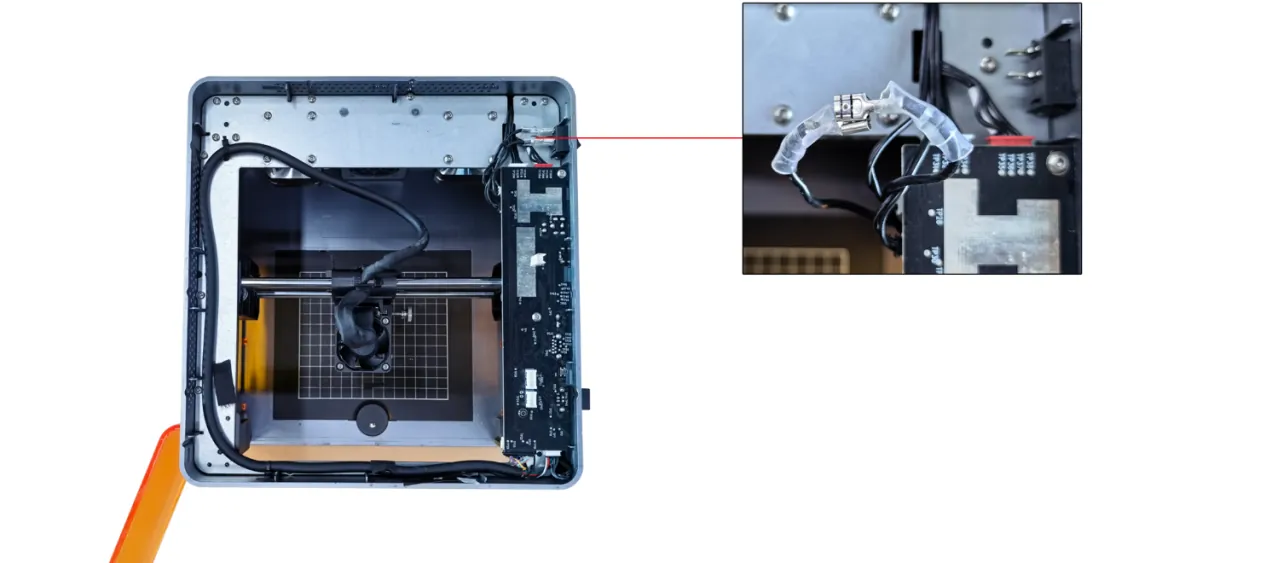
Figure 15
3) Contact Customer Support
If none of the above steps resolves the issue, send the following information to Customer Support:
- A video showing the fault.
- A description of the troubleshooting steps already performed.
- A photo of the machine's Serial Number, as shown in Figure 16.
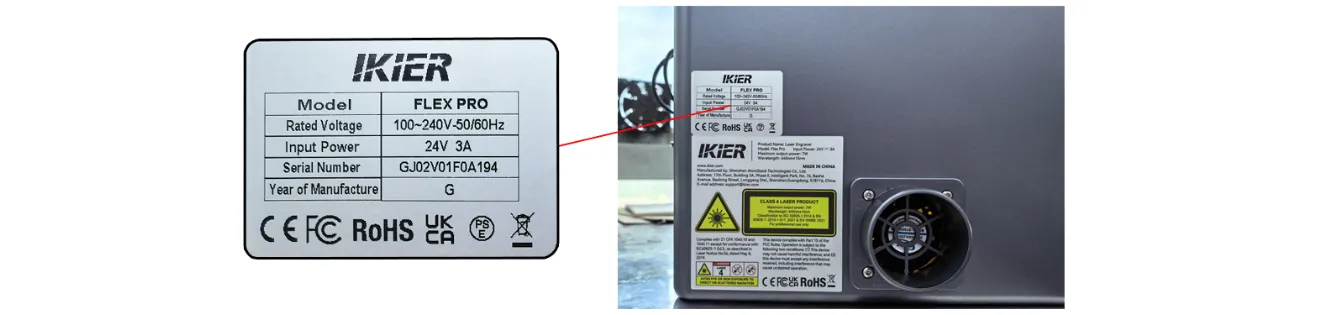
Figure 16
4) Replacement Part Reference Videos
- If the mainboard needs to be replaced, refer to the Flex Pro mainboard replacement video.
- If the power switch needs to be replaced, refer to the Flex Pro power switch replacement video.
¶ PC Won't Connect
What you see: Unable to Connect to the Computer
Follow the steps below to troubleshoot the issue one by one.
1) Confirm That the Machine Has Powered On Normally
Check whether the status indicator on top of the enclosure is illuminated and stays solid green, indicating normal standby mode. If the indicator is off or red, refer to the “Machine Will Not Power On” section first.
2) Confirm That the Connection Is Correct
① Check the Cable Connection:
When using a Type-C cable, the Type-C connector must be plugged into the laser engraver’s Computer port (see the “Unboxing and Installation” section).
② Check the Computer’s Operating System:
- Windows: Connect either the Type-C or Type-A end of the cable to a USB port on the computer. For desktop computers, connecting to a USB port on the back of the computer is recommended.
- macOS: The Type-C connector cannot be connected directly to the computer. Use a hub or adapter (as shown in Figure 17) to connect the Type-A end of the cable to the computer.
Note
Be sure to use a Type-C data cable that supports data transfer. Some cables support charging only and cannot establish communication.
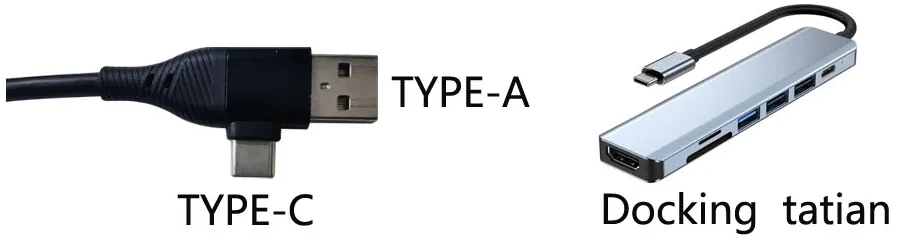
Figure 17
3) Confirm That the Serial Port Driver Is Installed
The serial port driver must be installed before first use. Download the driver from the links below:
- Windows: https://asa.atomstack.com/downloadWindowsDrivers.do3
- macOS: https://asa.atomstack.com/downloadMacDrivers.do3
Note
Verification: Open “Device Manager”on your computer and check under “Ports (COM & LPT)” for a serial port such as CH340, as shown in Figure 18.
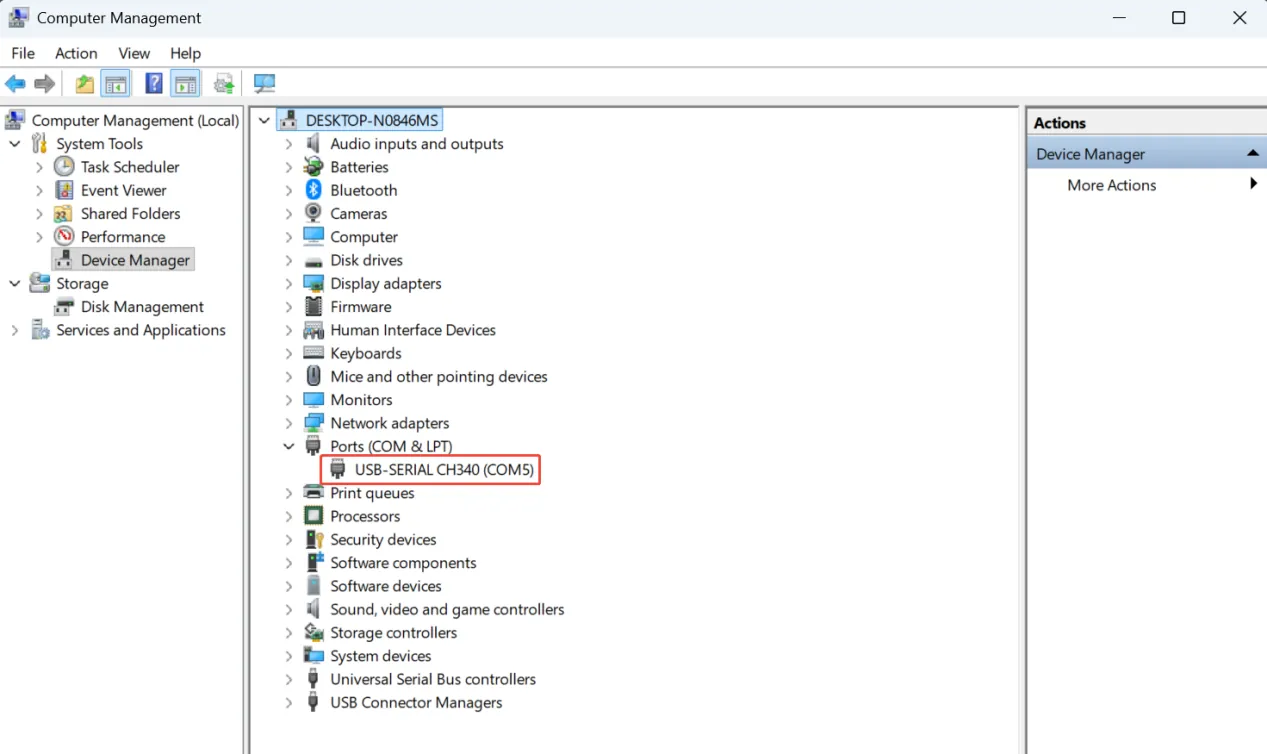
Figure 18
4) Confirm That the Software Is Configured Correctly
① AtomStack Studio
The software automatically identifies the machine model, so no additional configuration is required.
② LightBurn
Import the Flex Pro configuration file or modify the parameters manually as follows:
- Manually add a “GRBL” controller or import the Flex Pro configuration file.
- Set the engraving area:
Diode blue laser: 110 mm × 110 mm
Infrared laser: 105 mm × 100 mm
- Select the COM port corresponding to the Flex Pro.
5) Confirm That the Correct COM Port Is Selected (LightBurn)
If multiple COM ports are available on the computer, manually select the port corresponding to the laser engraver in LightBurn.
6) Try a Different Computer and Type-C Cable
- Try a different USB port on the computer. For desktop computers, a USB port on the back of the computer is recommended.
- Replace the cable with another Type-C data cable that supports data transfer. Do not use a charging-only cable.
- If possible, try connecting the machine to another computer to rule out compatibility issues with the current computer’s USB port or operating system.
7) Contact Customer Support
If none of the above steps resolves the issue, send the following information to Customer Support:
- Troubleshooting video: Clearly show how the Type-C data cable is connected at both ends (computer and machine), the connection process, and whether the serial port (CH340) is recognized in Device Manager.
- A description of the troubleshooting steps already performed.
- A photo of the machine’s Serial Number, as shown in Figure 19.
Figure 19
8) Replacement Part Reference
- If the mainboard needs to be replaced, refer to the Flex Pro mainboard replacement video.
¶ App Won't Connect
What you see: Unable to Connect to the Mobile App
Follow the steps below to troubleshoot the issue one by one.
1) Bluetooth Mode (Recommended)
① Confirm That the App Is Updated to the Latest Version
Open the app, tap the icon in the lower-right corner, then go to “Profile” → “Settings” → “About ATOMSTACK” to check the version information, as shown in Figure 20. If an update is available, install it before proceeding.
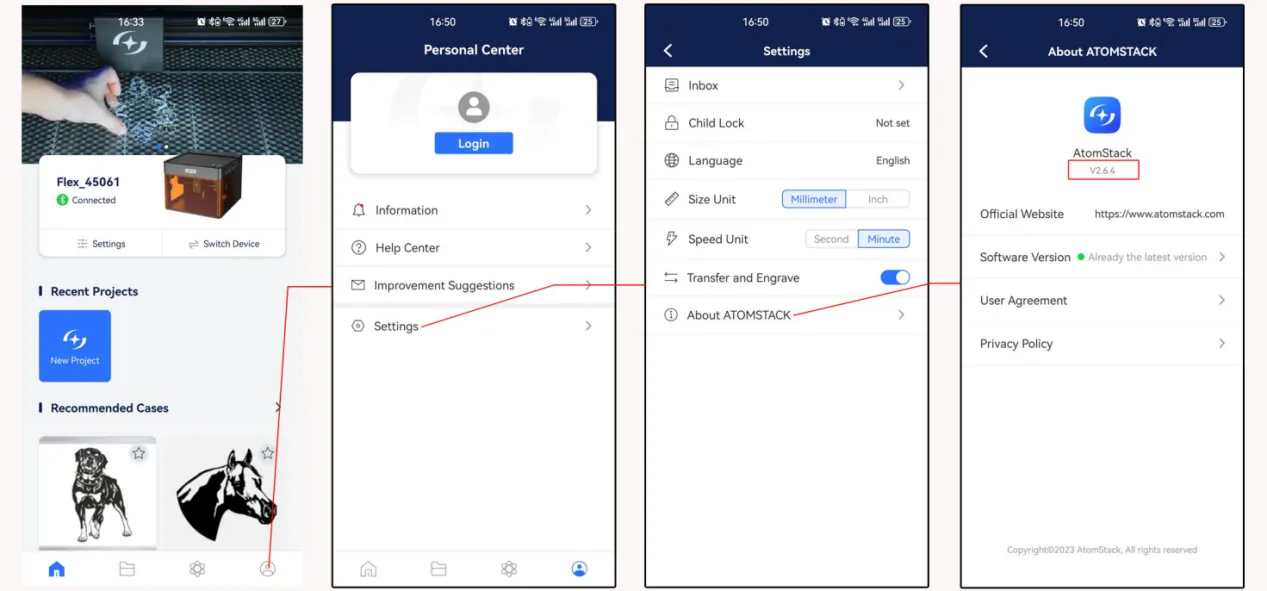
Figure 20
② Confirm That the Laser Engraver Is in Bluetooth Mode
- Press and hold the “Start/Pause” button to enter Bluetooth pairing mode. The indicator light on top of the machine will flash blue.
- Alternatively, on the touchscreen, tap “Settings” → “Wireless Connection” → “Bluetooth Connection,” then tap “Activate Bluetooth” → “Activate” to enable Bluetooth mode. After activation, the indicator light on top will also flash blue.
③ Confirm That Bluetooth Is Enabled on Your Phone
Open your phone’s system settings and check that Bluetooth is turned on.
④ Restart the Machine and the App
Turn off the laser engraver and close the app, then turn the machine back on and reopen the app to try connecting again.
⑤ Try a Different Phone
If possible, try connecting with another phone to rule out compatibility issues with the current phone.
2) Wi-Fi Mode
① Confirm That Wi-Fi Connection Mode Is Enabled
On the touchscreen, tap “Settings” → “Wireless Connection” → “Wi-Fi Connection.” The screen will display the available Wi-Fi networks. Select and connect to the Wi-Fi network corresponding to your router. Once connected successfully, use the Wi-Fi module in the app to search for and connect to the machine.
② Confirm That the Machine’s Wi-Fi Is Not in Use by Another Device
Make sure the machine’s Wi-Fi connection is not being used by another phone or software.
③ Restart the Machine and the App
Turn off the laser engraver and close the app, then turn the machine back on and reopen the app to try connecting again.
④ Try a Different Phone
If possible, try connecting with another phone to rule out compatibility issues with the current phone.
3) Contact Customer Support
If the issue persists after completing all the troubleshooting steps above, send the following information to Customer Support:
- Operation video: Record the entire connection process, including the operations on the phone screen and the machine’s status.
- App version number.
- Laser engraver firmware version: This can be found on the device information page after successfully connecting the machine through the computer client, as shown in Figure 21.
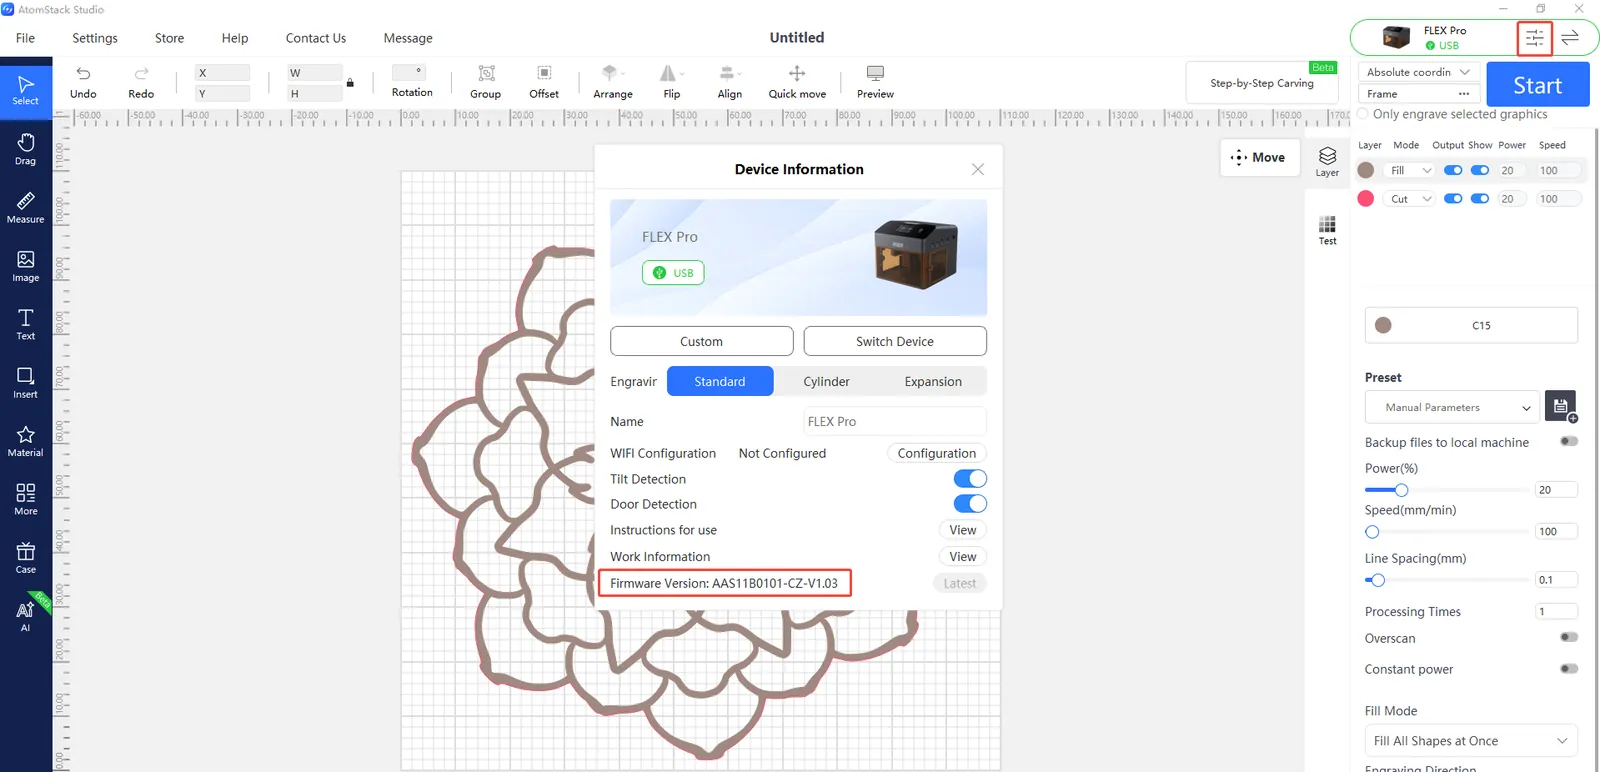
Figure 21
4) Replacement Part Reference
- If the mainboard needs to be replaced, refer to the Flex Pro mainboard replacement video.
¶ Wi-Fi: USB Not Inserted
What you see: A "USB Drive Not Inserted" Message Appears When Working via Wi-Fi
Please follow the steps below to troubleshoot the issue one by one.
1) Check Whether the TF Card Is Inserted
Check whether the TF card is properly inserted into the TF card slot and make sure it is the original TF card supplied with the machine.
2) Check Whether the TF Card Can Be Read and Written Normally
Insert the TF card into a card reader and connect it to a computer. Check whether the card can be read and written normally.
- If the card can be read and written normally and is the original card supplied with the machine → The mainboard may be faulty. Proceed with further troubleshooting.
- If the card cannot be read or written → Format the TF card to FAT32 and reinsert it into the machine to see whether the issue is resolved.
3) Try a Different TF Card
Test the machine with another TF card with a capacity of 16 GB or less. Cards exceeding 16 GB may prevent the machine from recognizing the card.
4) Check Whether the Firmware Has Been Updated Without Authorization
Some models have firmware versions that do not support TF card reading. If you have updated the firmware without authorization, please inform Customer Support.
5) Contact Customer Support
If the connection issue persists after completing all the troubleshooting steps above, contact Customer Support and provide the following information:
- Video of the issue: Include the problem and the read/write test performed on the computer.
- Serial Number photo: Provide a photo of the Serial Number label, as shown in Figure 32.
- Troubleshooting steps performed: Describe the steps you have already tried.
Figure 32
6) Replacement Part Reference
- If the mainboard needs to be replaced, refer to the Flex Pro mainboard replacement video.
¶ Status Light Stays Red
What you see: The Indicator Light Stays Red After Power-On
Refer to the Flex Pro troubleshooting video for a continuously red status indicator and follow the steps below to troubleshoot the issue.
Note
A solid red indicator light indicates an alarm condition. Connect the device using AtomStack Studio. If the device is in an alarm state, the software will display the corresponding alarm message.
1) USB Key Not Connected
Check whether the USB Key is inserted, as shown in Figure 33. You can also gently wiggle the USB Key to check whether the indicator light turns green.
Figure 33
2) Top Cover Is Open or Not Properly Closed (Top Cover Open)
The mainboard is equipped with a cover detection switch, as shown in Figure 34. If the top cover is not properly closed, the device will enter an alarm state and cannot operate normally. The software will display the message "Top Cover Open".
Figure 34
3) Abnormal Enclosure Opening
① Check whether the enclosure door is fully closed. Try opening and closing it again.
② Manually press the two trigger points on the enclosure door to check whether the machine resumes normal operation.
- If the machine operates normally after pressing the trigger points, the door was not fully closed. Check for any obstructions preventing it from closing properly.
- If the alarm persists, check whether the door detection limit switch or its cable connection to the mainboard is loose. Unplug the connector and reconnect it.
4) Limit Switch Triggered
Manually move the laser module to the center of the enclosure and check whether the indicator light turns green.
If the software still reports a limit switch collision, manually press the X-axis and Y-axis limit switches one by one, as shown in Figure 35. Check whether each switch triggers the alarm sound (beeping) to determine whether either limit switch is faulty.
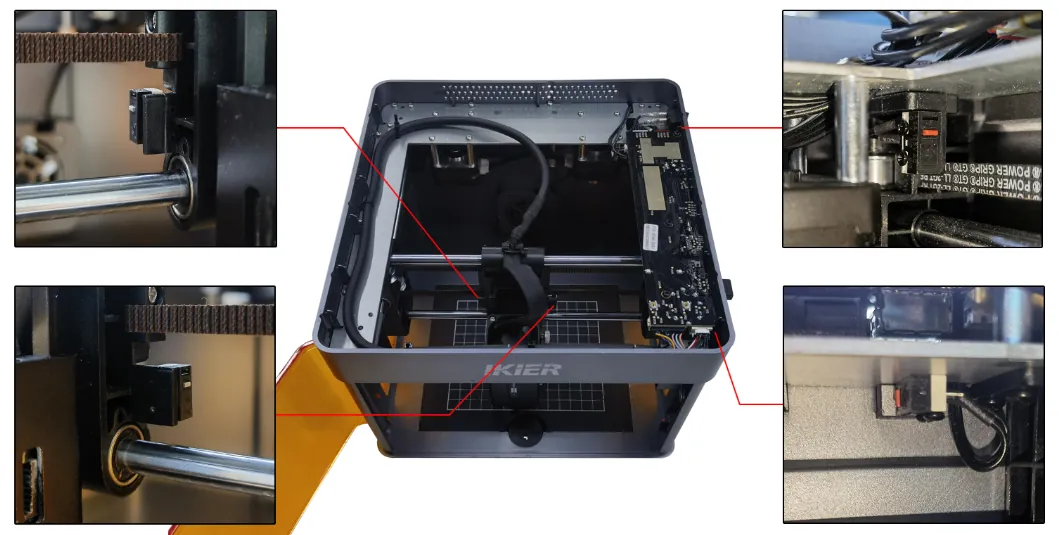
Figure 35
5) Tilt Alarm
Make sure the engraver is placed on a level surface. If the alarm persists, open the top cover of the enclosure and tighten the mounting screw next to the buzzer on the mainboard, as shown in Figure 36.
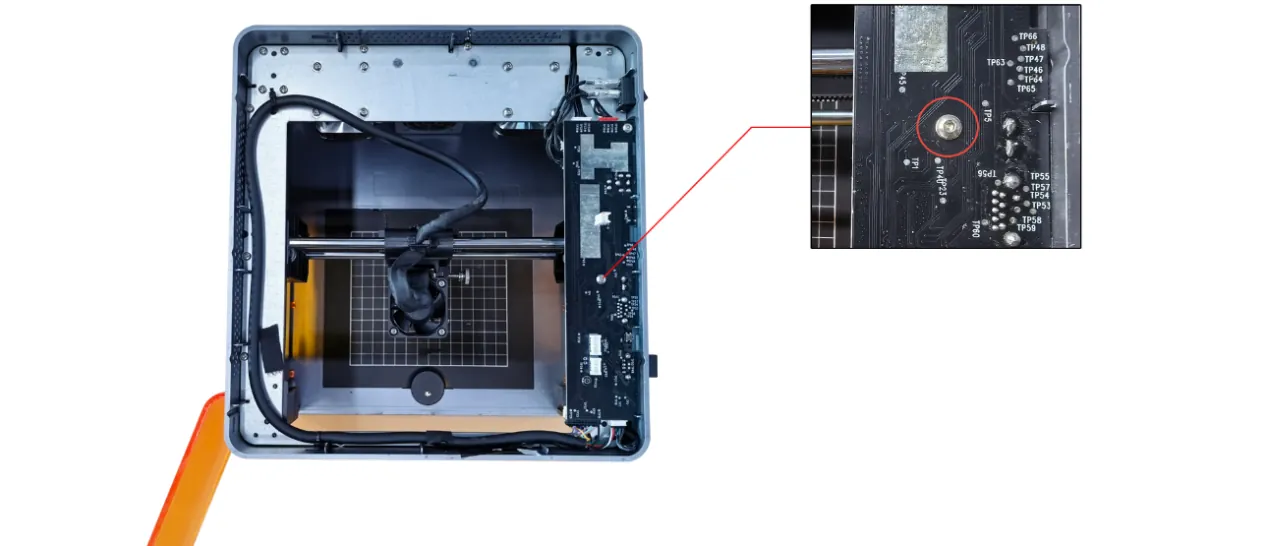
Figure 36
6) Restore Factory Settings
If none of the above steps resolves the issue, refer to the Flex Pro factory reset video and follow the steps below.
① AtomStack Studio
- Click Settings in the navigation bar and locate Version:
V*.*.*in the settings window. - Click the version number at least seven times consecutively. The Serial Port Log option (Developer Mode) will appear in the menu.
- Click Serial Port Log to open the interface. A series of execution commands will appear in the code window.
- Click Reset in the lower-right corner. If several lines of reset confirmation messages appear in the code window and the final output is OK, the reset has been completed successfully.
- Click Close in the upper-right corner to exit the interface.
② LightBurn
Open the Console window, enter $RST=* in the command field, and click Send, as shown in Figure 37.
Figure 37
7) Contact Customer Support
If you discover a problem during troubleshooting but cannot resolve it yourself, or if you cannot determine the cause of the fault, contact Customer Support and provide the following information:
- Video of the issue: The video must show the fault symptoms.
- Troubleshooting steps performed: Provide a description of the steps you have already tried.
- Device Serial Number photo: Provide a photo of the Serial Number label, as shown in Figure 38.
Figure 38
8) Replacement Part References
- If the mainboard needs to be replaced, refer to the Flex Pro mainboard replacement video.
- If the enclosure door limit switch needs to be replaced, refer to the Flex Pro enclosure door limit switch replacement video.
- If the X-axis or Y-axis limit switch needs to be replaced, refer to the Flex Pro X-axis/Y-axis limit switch replacement video.
¶ TF Card Not Recognized
What you see: The Engraver Cannot Recognize the TF Card
Please follow the steps below to troubleshoot the issue.
1) Reinsert the TF Card
Turn off the engraver, remove the TF card, and then reinsert it. Power on the machine and check whether the card is recognized normally.
2) Check the Storage Capacity
A TF card with a capacity of 16 GB or less is recommended. A card with excessive storage capacity may prevent the engraver from recognizing it.
3) Check the Read/Write Function
Turn off the engraver, remove the TF card, insert it into a card reader (not included), and connect the card reader to a computer. Check whether the card is recognized normally.
- If the computer recognizes the card and it can be read and written normally, but the engraver still cannot recognize it, format the TF card to FAT32 and reinsert it into the engraver to try again.
- If the computer cannot recognize the card, try formatting it to FAT32. If the card is still not recognized, the TF card is faulty.
4) Replace the TF Card
Try another TF card with a capacity of 16 GB or less, formatted to FAT32, and insert it into the engraver to check whether it is recognized normally. If the card is still not recognized, the mainboard is faulty.
5) Contact Customer Support
If none of the above steps resolves the issue, or if you identify a problem that you cannot fix yourself, contact Customer Support and provide the following information:
- Video of the issue: Clearly show the fault symptoms and the troubleshooting process.
- Troubleshooting steps performed: Provide a description of the steps you have already tried.
- Device Serial Number photo: Provide a photo of the Serial Number label, as shown in Figure 39.
Figure 39
6) Replacement Part Reference
- If the mainboard needs to be replaced, refer to the Flex Pro mainboard replacement video.
¶ USB Key Not Connected
What you see: The Software Indicates That the Safety Lock Is Not Connected, Preventing Normal Operation
Please follow the steps below to troubleshoot the issue.
1) Check the USB Key
- Check whether the USB Key is plugged in, as shown in Figure 40. If it is already plugged in, gently wiggle the USB Key to check whether the indicator light turns green.
- Try the other USB Key included in the package and check whether normal operation is restored.
Figure 40
2) Restore Factory Settings
If the above steps do not resolve the issue, refer to the Flex Pro factory reset video and follow the steps below.
① AtomStack Studio
- Click the Settings menu in the navigation bar and locate “Version:
V*.*.*” in the Settings window. - Click the version number at least seven times in succession. The “Serial Port Log” option (Developer Mode) will appear in the menu bar.
- Click “Serial Port Log” to open the interface. A series of execution commands will appear in the code box.
- Click “Reset” in the bottom-right corner of the interface. If the console indicates that the reset is complete and displays “OK” as the final message, the reset has been completed successfully.
- Click “close” in the top-right corner of the interface to exit.
② LightBurn
Select “Console,” enter $RST=* in the command input box, and click Send, as shown in Figure 41.
Figure 41
3) Contact Customer Support
If you encounter a problem during troubleshooting that you cannot resolve yourself, or if you are unable to identify the cause of the fault, please provide the following information to Customer Support:
- A video showing the issue.
- A description of the troubleshooting steps already performed.
- A photo of the device's Serial Number, as shown in Figure 42.
Figure 42
4) Component Replacement Reference
- If the mainboard needs to be replaced, refer to the Flex Pro mainboard replacement video.