¶ Flex Maintenance and Care
Routine care maintains engraving quality and extends the service life of the laser and motion system.
¶ 1. Maintenance Schedule
| Item | Recommended Cleaning Frequency (recommended to use anhydrous ethanol + lint-free cloth) |
|---|---|
| Laser Protective Window Glass | Blue Diode Laser: clean once after a cumulative usage time of more than 8 hours or when a decrease in power is observed. IR Laser: clean once after a cumulative usage time of more than 100 hours or when a decrease in power is observed. |
| Laser Focusing Lens (12W) | Clean when the lens is severely contaminated or damaged. |
| Laser Cooling Fan | Clean once after a cumulative usage time of more than 100 hours or when obvious dust accumulation is observed. |
| Exhaust Fan | Clean once after a cumulative usage time of more than 100 hours or when obvious dust accumulation is observed. |
| Linear Shafts | Clean once after a cumulative usage time of more than 100 hours or when obvious dust accumulation is observed. |
| Inside of the Machine | Clean once after a cumulative usage time of more than 100 hours or when obvious dust accumulation is observed. |
¶ 2. Laser Maintenance
- Cleaning Tools:
-
Lint-free cloth.
-
Anhydrous ethanol (purity of 99% or higher is recommended).
-
Soft-bristled brush.
-
Phillips screwdriver.
- Cleaning Steps:
- Remove the Laser
Turn off the engraving machine, remove the laser, and disconnect the laser cable.
- Clean the Protective Window
Apply a small amount of anhydrous ethanol to a lint-free cloth. Wipe in a spiral motion from the center of the protective window outward, gently wiping in one direction to avoid scratches caused by repeated back-and-forth rubbing.
- Clean the Focusing Lens (12W)
Apply a small amount of anhydrous ethanol to a lint-free cloth. Wipe in a spiral motion from the center of the focusing lens outward, gently wiping in one direction to avoid scratches caused by repeated back-and-forth rubbing.
- Remove the Fan
Use a Phillips screwdriver to remove the four screws on the rear cover of the laser. Remove the fan from the side opposite the driver board.
- Clean the Fan
Gently remove dust from the fan blades using a soft-bristled brush. Apply anhydrous ethanol to a lint-free cloth and gently wipe the surface of the fan blades to remove stubborn stains.
- Reinstall the Fan
After cleaning, first position the four screw washers properly. Then reinstall the fan and rear cover, and tighten the screws.
- Cleaning Frequency:
| Laser | Protective Window Cleaning Recommendation | Fan Cleaning |
|---|---|---|
| Blue Diode Laser | Clean once after a cumulative usage time of more than 8 hours or when a decrease in power is observed. | Clean once after a cumulative usage time of more than 100 hours or when obvious dust accumulation is observed. |
| IR Laser | Clean once after a cumulative usage time of more than 100 hours or when a decrease in power is observed. | Clean once after a cumulative usage time of more than 100 hours or when obvious dust accumulation is observed. |
- ⚠ Notes:
-
Do not use ordinary paper towels or cotton swabs for cleaning, as they may leave fibers or water stains.
-
Do not use corrosive liquids (such as acetone, gasoline, etc.) for cleaning.
-
All operations should be performed gently. Avoid excessive force to prevent damage to components.
¶ 3. Enclosure Maintenance
- Cleaning Tools:
-
Lint-free cloth.
-
Anhydrous ethanol (99% purity or higher recommended).
-
Soft-bristle brush.
-
L2.0 hex key.
-
Grease (White Lithium Grease No. 2 or No. 3 recommended; No. 2 for low-temperature environments and No. 3 for room-temperature environments).
- Cleaning Procedure:
① Remove the Exhaust Fan. Turn off the power to the laser engraver. Use an L2.0 hex key to remove the four screws securing the exhaust fan on the back of the enclosure (as shown in Figure 9). Then, remove the fan and fan flange.
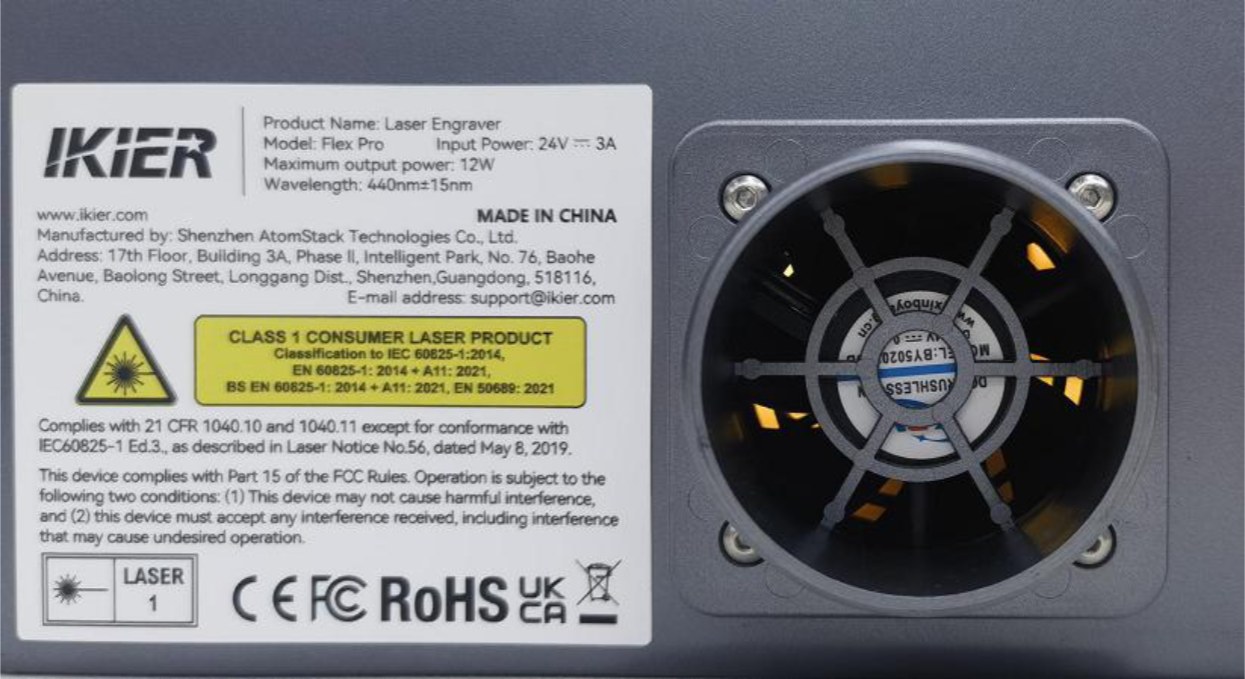
Figure 9
② Clean the Fan and Fan Flange. Use a soft-bristle brush to remove dust buildup from the exhaust fan and fan flange. Then, use a lint-free cloth dampened with anhydrous ethanol to wipe away stubborn stains.
③ Clean the Linear Shafts of the Laser Engraver. Open the enclosure door and push upward on the top cover from inside the enclosure to open it. Dampen a lint-free cloth with anhydrous ethanol and gently wipe the four linear shafts inside the enclosure to remove surface dirt. After cleaning, be sure to apply grease evenly to maintain proper lubrication.
Grease Recommendation: White Lithium Grease No. 2 or No. 3 is recommended. Use No. 2 grease when the ambient temperature is below 15°C and No. 3 grease when the ambient temperature is above 15°C.
④ Clean the Interior of the Laser Engraver. Use a lint-free cloth dampened with anhydrous ethanol to gently wipe away dust and stains from the various surfaces inside the enclosure.
⑤ Reassemble the Components.
-
Install the Top Cover: After cleaning, press the top cover back into place in the correct orientation and ensure that it is properly seated. Otherwise, the limit switch of the lid-open detector may not be triggered properly.
-
Install the Exhaust Fan: After cleaning and wiping the components, reinstall the fan in its original position first, then install the fan flange. Ensure that the fan flange fits tightly against the enclosure, and finally tighten the four securing screws.
- Cleaning Frequency:
| Cleaning Area | Cleaning Frequency |
|---|---|
| Exhaust Fan | Clean after every 100 hours of cumulative use, or whenever there is visible dust buildup. |
| Linear Shafts | Clean after every 100 hours of cumulative use, or whenever they become dirty. |
| Interior of the Enclosure | Clean after every 100 hours of cumulative use, or whenever there is visible dust buildup. |
- Notes:
-
Do not use ordinary paper towels or cotton swabs for cleaning, as they may leave fibers or water stains.
-
Do not use corrosive liquids (such as acetone, gasoline, etc.) for cleaning.
-
All operations should be performed gently. Avoid excessive force to prevent damage to components.
¶ 4. Precautions for Long-Term Storage
If the laser engraver will not be used for an extended period, follow the recommendations below to help prolong the service life of the equipment:
- Storage Environment
Store the laser engraver in a dry, dust-free environment. Avoid humid environments, which may cause electronic components to become damp or oxidized. Before storage, be sure to clean out any debris inside the enclosure.
- Power On and Run the Machine Regularly
It is recommended to power on and run the machine for at least 5 minutes once a month to remove internal moisture and keep the electrical system and electronic components in good condition.
- Rust Prevention for Linear Shafts
Before long-term storage, it is recommended to apply an appropriate amount of rust-preventive oil to the surfaces of the linear shafts to prevent rust caused by changes in ambient humidity, which may affect subsequent motion accuracy.
- Inspection Before Reuse
When restarting the machine after a long period of inactivity, it is recommended to first check the lubrication condition of the linear shafts and the tension of the timing belts. Then, run the machine without processing for 5 minutes to check for any abnormal noise or jamming. Proceed with normal processing only after confirming that the machine is operating normally.