¶ The LED Light Strip Inside Master Enclosure Does Not Turn On

Solution: Please refer to the Master enclosure LED light strip troubleshooting guide.
- Confirm that the machine has started normally:
After powering on, make sure the mainboard starts normally, the buzzer sound is heard, and the machine can connect properly.
- Check the LED light strip wiring:
Turn off the power and remove the outer cover. Check whether the LED light strip cable connections are loose.
If you have a multimeter, you can also measure whether the voltage on the cable is abnormal.
- If the above checks show no issues, the LED light strip may be faulty. Please send the following to customer service:
-
A video showing the issue
-
Screenshots of any software prompts or messages
-
The troubleshooting steps already performed
-
A photo of the machine’s Serial Number (see Figure 68)

For replacement instructions, please refer to the Master enclosure LED light strip replacement video.
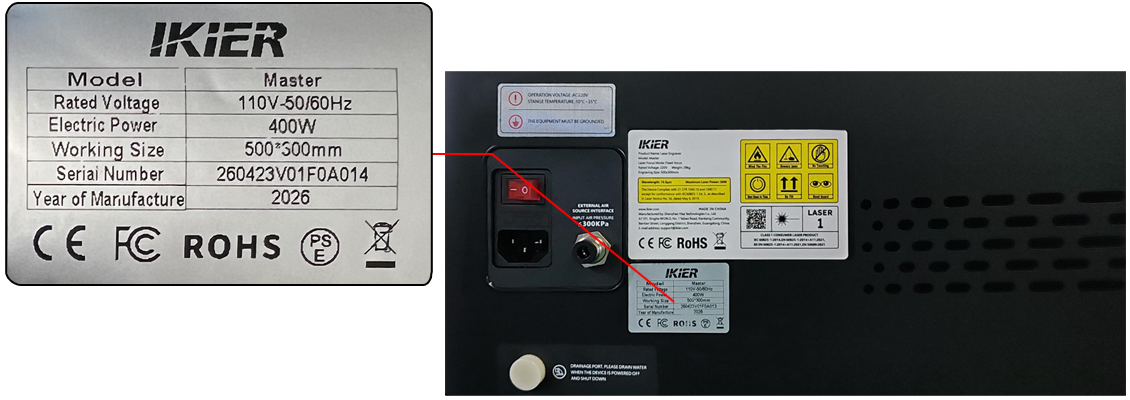
Figure 68
¶ Smoke and Dust Inside the Master Enclosure Cannot Be Exhausted in Time and Leak Out Through the Door Gaps

Solution: Please refer to the Master smoke exhaust troubleshooting guide.
- Check whether an air purifier is being used:
If an air purifier is connected, disconnect the exhaust hose from the purifier and vent it directly outdoors. Then check whether the smoke inside the enclosure can be exhausted properly.
If the smoke can be exhausted normally after bypassing the purifier, the issue is likely caused by the air purifier.
- Check the exhaust fan condition:
The internal shield panel must be removed first.
- Check whether the fan is clean:
If there is excessive dust buildup on the fan, please refer to the “Master Enclosure Cleaning” section for cleaning instructions.
- Check whether the fan blades are intact:
If any fan blades are broken or damaged, please send clear photos and a photo of the machine’s Serial Number (see Figure 69) to customer service for assistance.
Figure 69

For fan replacement instructions, please refer to the Master enclosure fan replacement video.
- Check the fan wiring:
After removing the shield panel, inspect the fan cable connections and confirm that the cables are securely connected (see Figure 70).
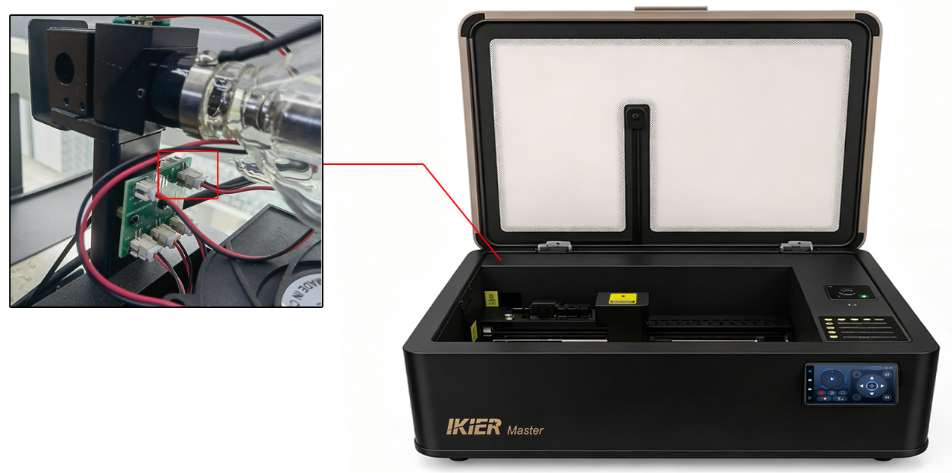
Figure 70
- Supply power directly to the fan:
Use an external 12V or 24V power adapter and connect it to the fan terminals using two additional wires to check whether the fan rotates normally (see Figure 71).
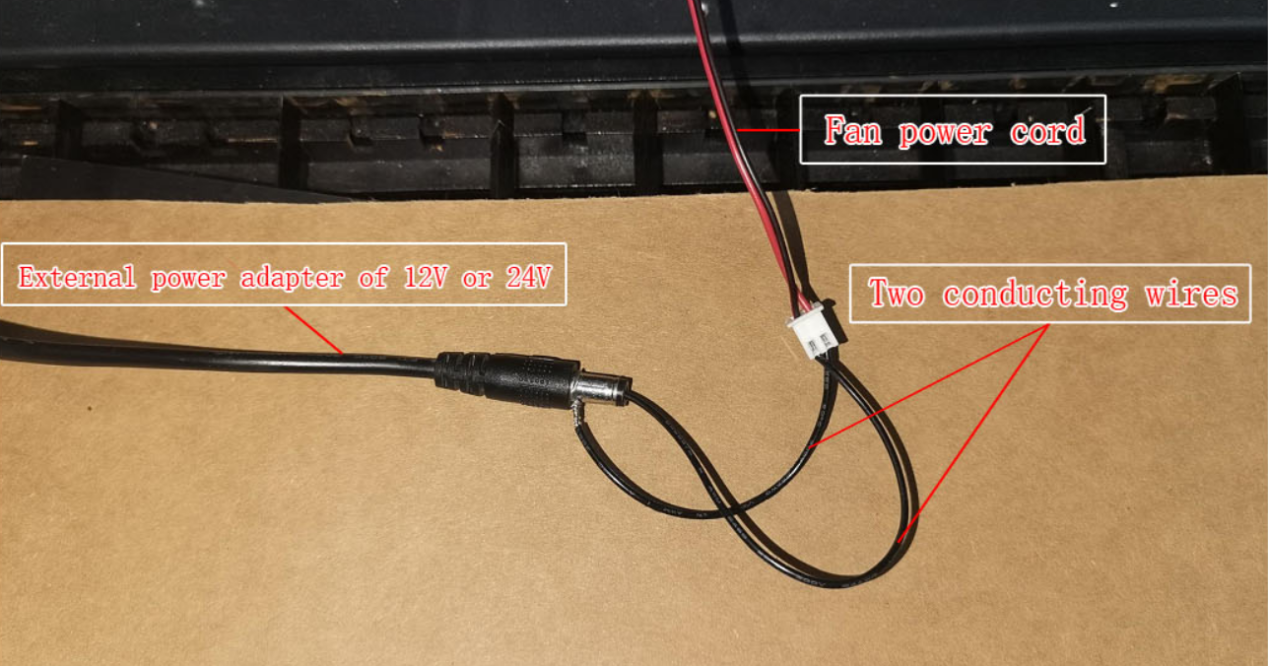
Figure 71
- If the fan is confirmed to be faulty, please send the following to customer service:
-
A video showing the issue
-
The troubleshooting steps already performed
-
A photo of the machine’s Serial Number
¶ The Master’s Flame Detection Function Fails and No Alarm Is Triggered Even When a Fire Occurs

Solution: Please refer to the Master flame detection troubleshooting guide.
- Confirm that the flame detection function is enabled:
After connecting the machine, check in AtomStack Studio whether the flame detection function is enabled (see Figure 72).
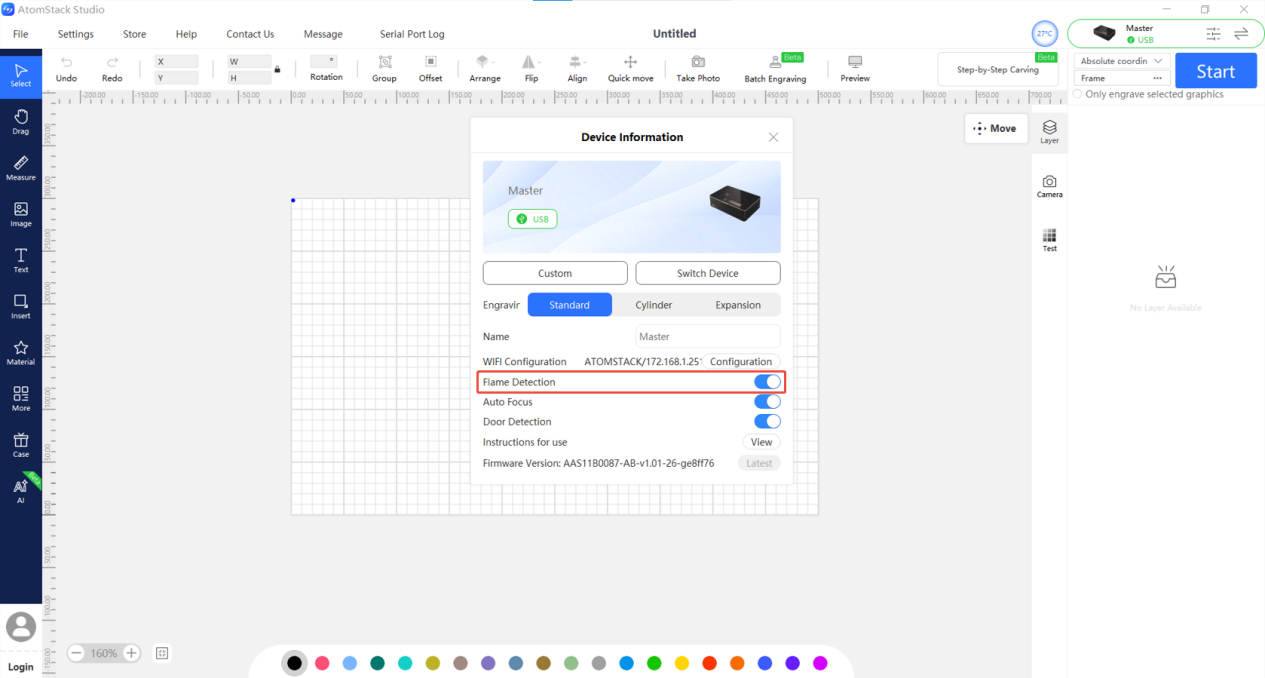
Figure 72
- Check the flame detection board wiring:
Open the Z-axis shield cover and check whether the cable connected to the flame detection board is loose (see Figure 73).
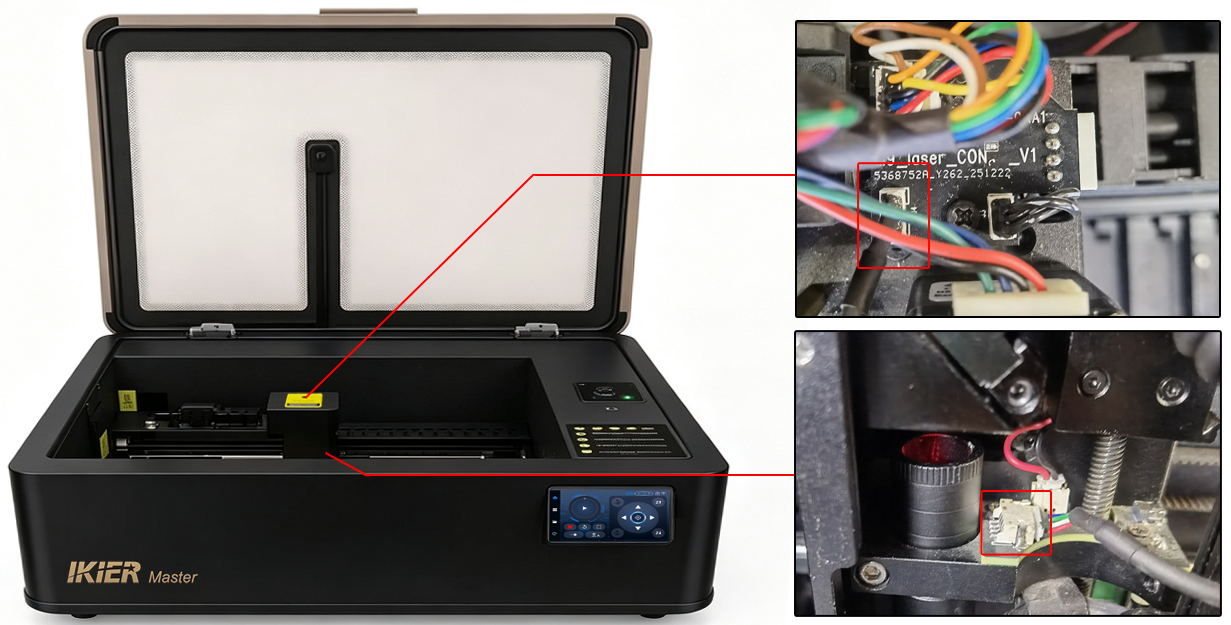
Figure 73
Also inspect the cable for any damage or breakage.
- Test the flame detection board function:
Use a regular lighter (not a windproof lighter) to create a flame and place it under the flame detection board for about 1 second. Check whether the alarm is triggered.
If the alarm is not triggered while all other machine functions operate normally, the flame detection board is likely faulty.
Please send the following to customer service:
-
A video showing the issue
-
The troubleshooting process already performed
-
A photo of the machine’s Serial Number (see Figure 74)
Figure 74

For replacement instructions, please refer to the Master flame detection board replacement video.
¶ The Master’s Flame Detection Function Triggers False Alarms When No Fire Is Present
- Check the working environment:
If the engraving machine is exposed to direct sunlight, the flame alarm may be triggered falsely. Move the machine to another location or block direct sunlight exposure.
- Check the engraving or cutting file design:
If the engraving or cutting file contains extremely dense lines, it may falsely trigger the flame alarm. Try increasing the speed and increasing the number of passes to reduce the chance of false alarms.
- Check the material being processed:
If the engraving or cutting material is highly flammable, such as MDF, balsa wood, cork, or paper, it may easily trigger the flame alarm.
You may disable the flame detection function before engraving or cutting these materials. However, when the flame detection function is disabled, the machine must be continuously supervised during operation to prevent accidents.
- Adjust the flame detection sensitivity:
If the flame alarm is frequently triggered when processing a certain material even though no actual fire occurs, you may adjust the flame detection sensitivity appropriately.
Note
-
If the sensitivity settings are changed, they should be restored to the original values when switching to different materials.
-
The machine must still be supervised during operation after modifying these settings.
Adjustment commands:
$fire_alarm/overflow_value=10
Adjusts the number of trigger events required after exceeding the threshold.
(Usually does not need to be modified.)
$fire_alarm/threshold_value=97
Adjusts the flame detection threshold.
The higher the value, the more difficult it is to trigger the flame alarm.
Only modify the number after the equals sign.
- If the above steps do not resolve the issue, please send the following to customer service:
-
A video showing the issue
-
The troubleshooting steps already performed
-
A photo of the machine’s Serial Number (see Figure 75)
For replacement instructions, please refer to the Master flame detection board replacement video.
¶ Master Displays a Water Temperature Abnormality Alarm

Solution: Please refer to the Master water temperature abnormality troubleshooting guide.
- Check the water tank level:
Make sure the water level in the tank is not too low. If the water level is low, add the required cooling liquid.
- Check the working environment:
The recommended operating environment for the Master is 5°C–35°C.
-
If the temperature is below 5°C, add non-corrosive antifreeze coolant. Please refer to the “Master Water Tank Refill and Replacement Guide” section for details.
-
If the ambient temperature exceeds 35°C, use air conditioning to lower the room temperature.
Note
-
When the water temperature exceeds 35°C, the machine will issue a high-temperature warning.
-
When the water temperature exceeds 40°C, the machine will enter alarm mode and automatically stop operating.
- Check the water temperature reading:
Use AtomStack Studio or the control screen to check whether the displayed water temperature is normal.
If the water temperature exceeds 35°C, stop the machine and allow it to rest for 10 minutes. Also check whether the working environment temperature is too high.
- Check the temperature sensor:
If the ambient temperature is normal, the water level is normal, and the machine still reports a water temperature abnormality shortly after startup, check whether the water tank temperature sensor cable is loose (TEMP connector, see Figure 76).
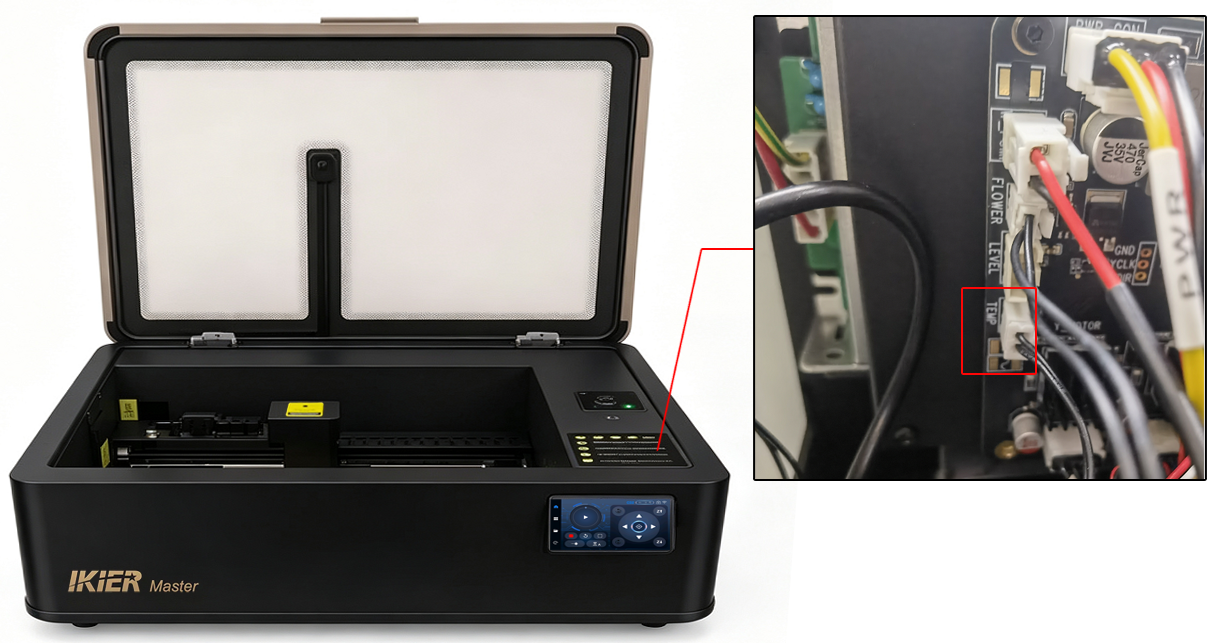
Figure 76
If the cable connection is secure, the temperature sensor may be faulty.
¶ Master’s Door-opening Detection Function Fails and the Machine Does Not Stop When the Enclosure Door Is Opened During Operation

Solution: Please refer to the Master door-opening detection troubleshooting guide.
- Confirm that the door detection function is enabled:
After connecting the machine, check whether the door detection function is enabled in either:
-
the machine settings on the control screen, or
-
the machine function settings in AtomStack Studio (see Figure 77).
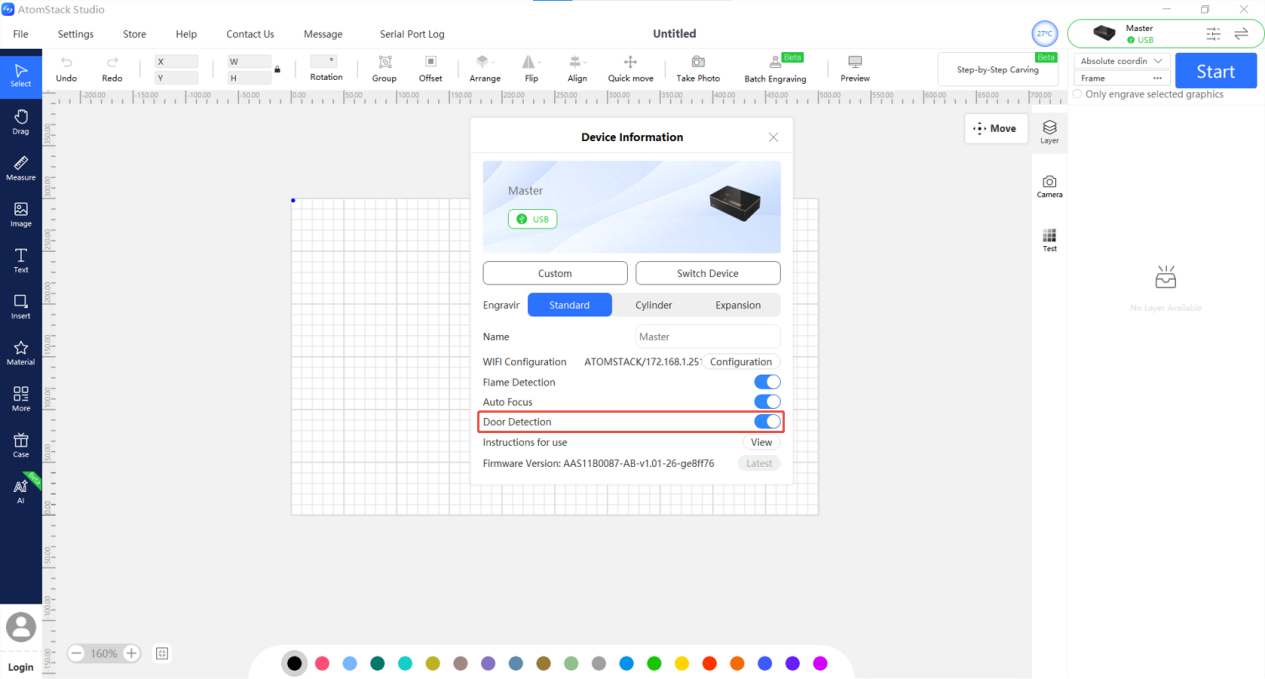
Figure 77
- Check the enclosure door limit switch:
- Hall sensor switch (please distinguish carefully):
Start an engraving task and open the enclosure door. If no alarm is triggered, the Hall sensor switch may be faulty.
Please send the following to customer service:
-
A video showing the issue
-
A photo of the machine’s Serial Number (see Figure 78)
Figure 78
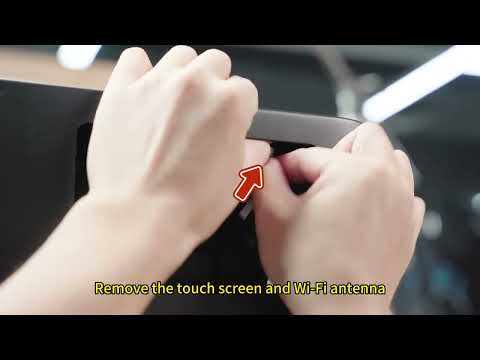
For replacement instructions, please refer to the Master limit switch replacement video.
Note
Before receiving the replacement part, if continued operation is necessary, you may disable the door detection function in the software.
However, for safety reasons, do not open the enclosure door while the machine is operating.
- Enclosure door limit switch (please distinguish carefully):
Start an engraving task. After opening the enclosure door, manually press and release the limit switch lever to check whether the machine stops.
If the machine does not stop, the enclosure door limit switch may be faulty.
Please send the following to customer service:
-
A video showing the issue
-
A photo of the machine’s Serial Number
For replacement instructions, please refer to the Master limit switch replacement video.
¶ Master Still Displays “Tray Not Inserted” After the Tray Has Been Installed
- Check whether the drawer Hall sensor switch is functioning properly:
Place a magnet near the Hall sensor switch located at the front-left bottom area of the machine (see Figure 84) and check whether the alarm is cleared.
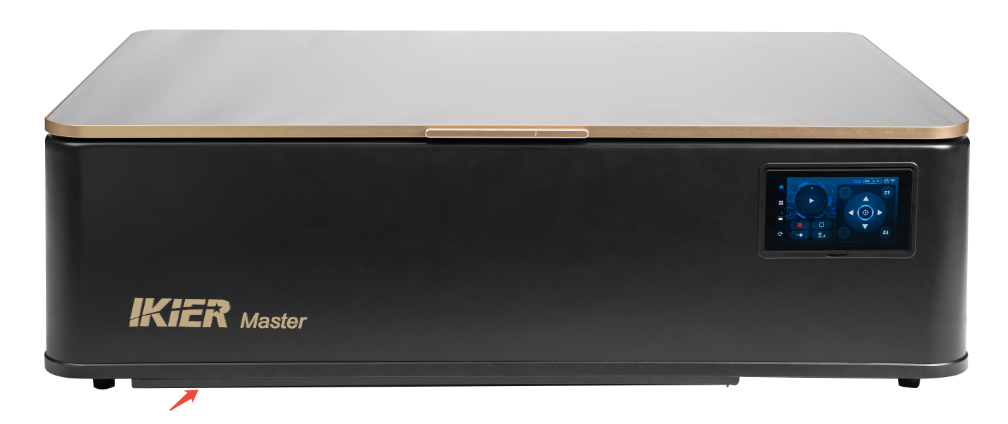
Figure 84
- Check the drawer Hall sensor wiring:
Open the machine enclosure and check whether the Hall sensor cable is connected properly.
If the cable connection is secure, the Hall sensor switch may be faulty.
Please send the following to customer service:
-
A video showing the issue
-
The troubleshooting steps already performed
-
A photo of the machine’s Serial Number (see Figure 85)
For replacement instructions, please refer to the Master limit switch replacement video.
Figure 85