¶ Master Cannot Power On Normally, and the Power Indicator Light Is Off

Solution: Please refer to the Master power-on troubleshooting video.
- Check the voltage specification:
Make sure the machine matches the local mains voltage. Master is available in both 220V and 110V versions for different regional power standards.
- Check the power cable:
Make sure the power cable is securely connected. Unplug the power cable and reconnect it firmly.
- Check the emergency stop switch:
Make sure the emergency stop switch has been released. Press the knob, rotate it clockwise, and then release it.
- If the issue still cannot be resolved, the power switch may be faulty. Please provide a photo of the machine’s Serial Number (see Figure 20) and a video showing the issue to customer service for assistance.

For power switch replacement instructions, please refer to the Master power switch replacement video.
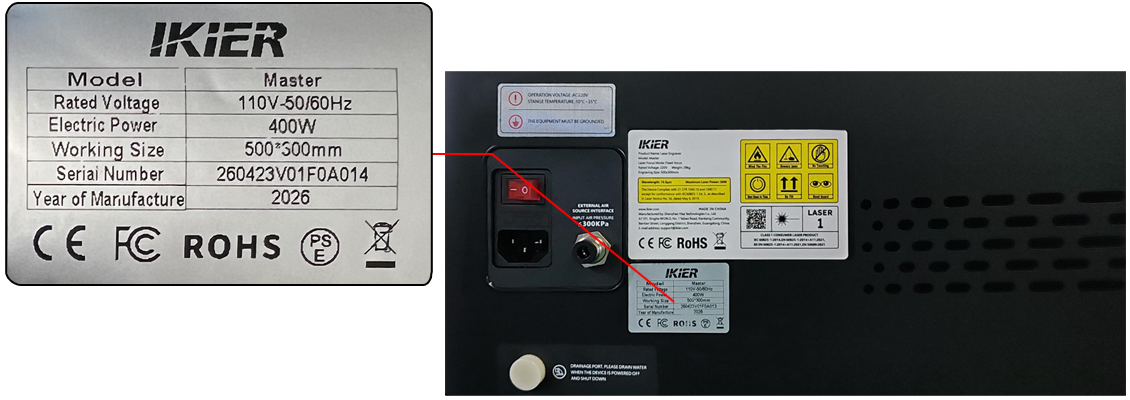
Figure 20
¶ Master Cannot Power On Normally, but the Power Indicator Light Is On
Solution: Please refer to the Master power-on troubleshooting video.
- Check whether there is a buzzer sound after powering on:
If there is no buzzer sound, it indicates that the mainboard has not started properly. First, check whether the indicator light on the mainboard is on.
- Check the mainboard indicator light:
- If the mainboard indicator light is on, but there is no buzzer sound and the machine cannot connect normally:
This may indicate a mainboard failure. Disconnect all cables connected to the mainboard except for the mainboard power cable (see Figure 21), then restart the machine to check whether the buzzer sound can be heard and whether the machine can connect properly.
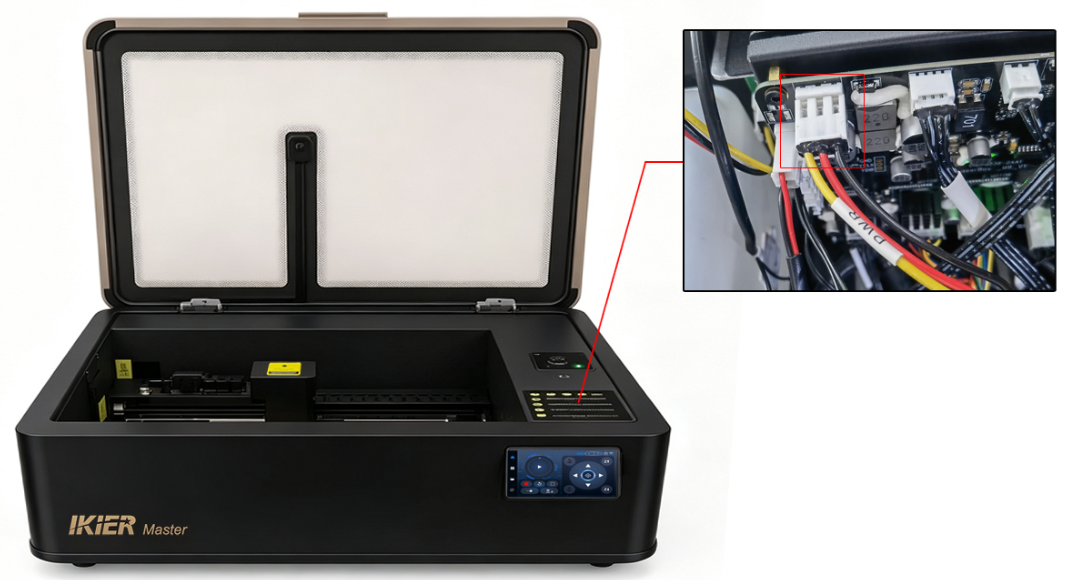
Figure 21
-
If the machine starts normally and connects properly after disconnecting the other cables, reconnect the cables one by one to identify which cable is causing the issue, then report the results to customer service for assistance.
-
If there is still no buzzer sound, the mainboard is likely faulty. Please send the machine’s Serial Number and a video showing the issue to customer service for assistance. For mainboard replacement instructions, please refer to the Master mainboard replacement video.
-
If the mainboard indicator light is not on:
This may indicate a switching power supply failure. If you have a multimeter, use the DC voltage mode to measure whether the input voltage between the red and black wires of the mainboard power cable is 24V (see Figure 22).
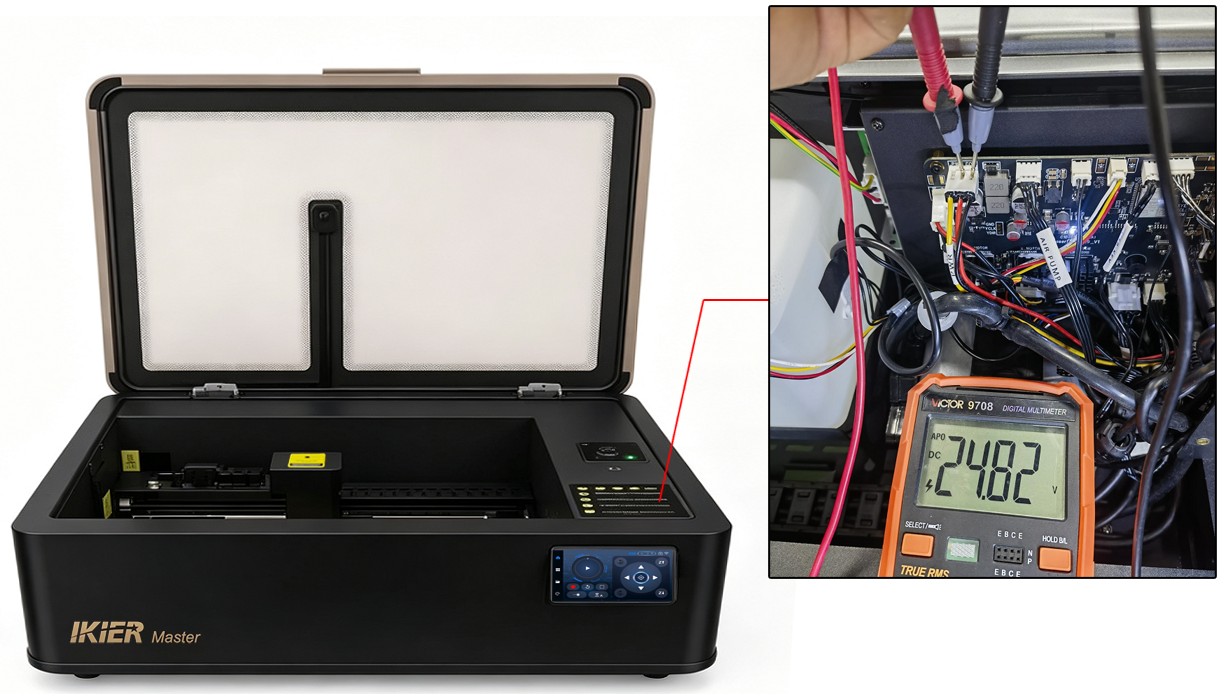
Figure 22
-
If no voltage is detected, the switching power supply is considered faulty. Please send the machine’s Serial Number (see Figure 23) and a video of the voltage measurement to customer service for assistance. For switching power supply replacement instructions, please refer to the Master switching power supply replacement video.
-
If 24V is measured but the mainboard appears to be continuously restarting, the switching power supply may still be faulty.
Figure 23
¶ Master Cannot Connect to the Computer

Solution: Please refer to the Master connection troubleshooting video.
- Confirm that the machine has started normally:
Check whether you can hear the mainboard buzzer sound.
-
If the buzzer sound is heard, the machine has started normally.
-
If there is no buzzer sound, please refer to the “Master Cannot Power On Normally” section for troubleshooting.
- Check whether the Type-C cable is properly connected:
Disconnect the Type-C cable from both ends and reconnect it to the machine and the computer USB port, or try a different USB port on the computer.
- Confirm the operating system:
-
Windows computers can directly use a Type-C to USB-A cable or a USB-C connection.
-
macOS or HarmonyOS computers require a docking station/hub (see Figure 24) to connect the USB-A end of the Type-C cable.
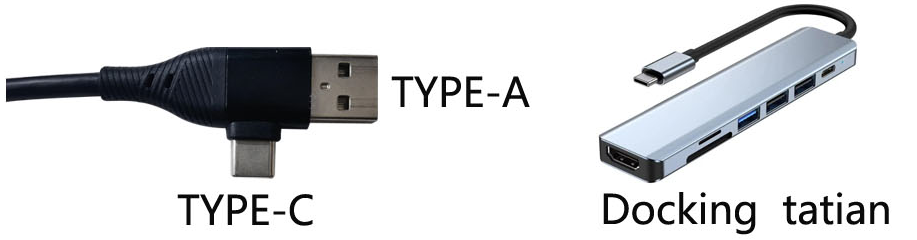
Figure 24
- Check the serial port:
-
When using AtomStack Studio, no additional confirmation is required.
-
When using LightBurn, make sure the correct serial port is selected. Check which COM port the CH340 device is assigned to in the computer’s Device Manager (see Figure 25).
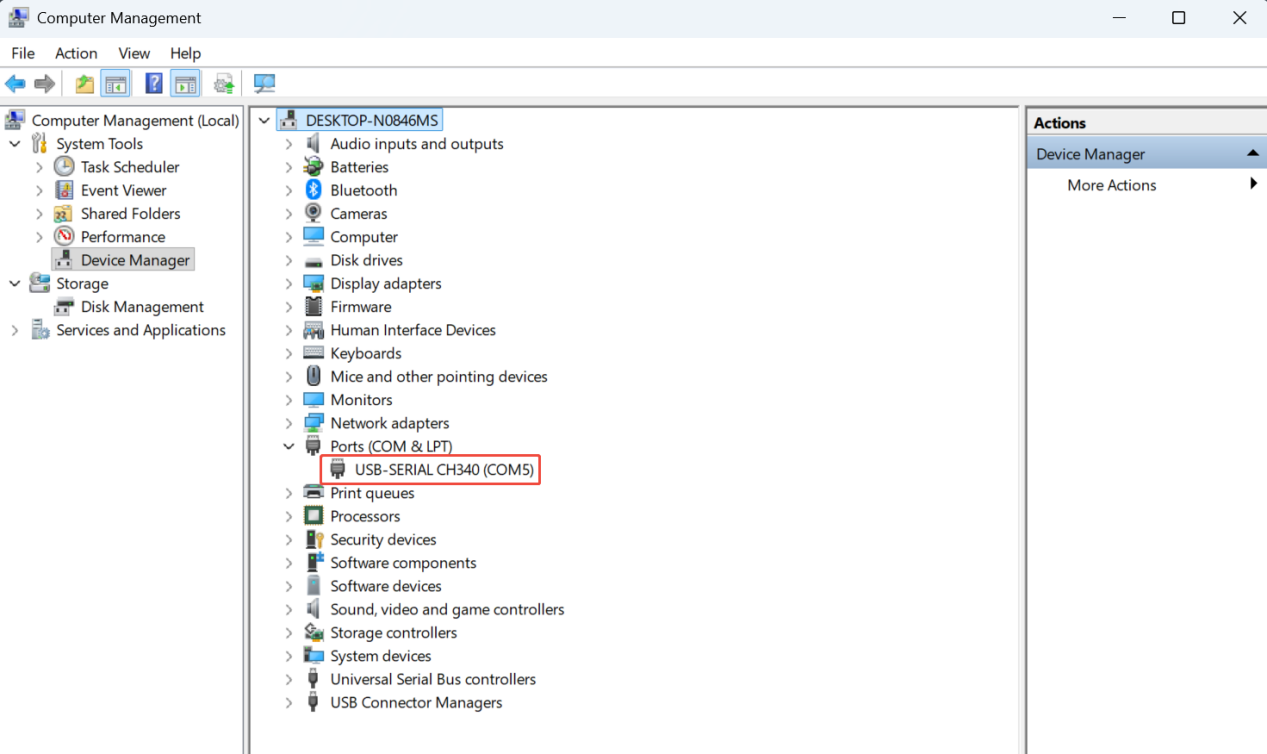
Figure 25
- Make sure no other software is occupying the connection:
Ensure that no other software is currently connected to the engraving machine.
- Check the configured controller:
- AtomStack Studio does not require additional setup.

- When using LightBurn, make sure a GRBL controller has been added or import the factory configuration file included with the Master. Please refer to the LightBurn connection section in the Master online connection tutorial video.
Check the serial port driver:
In Device Manager, check whether a CH340 serial device is present. If not, please install the serial driver first. Driver download links are as follows:
-
-Windows driver download link: https://asa.atomstack.com/downloadWindowsDrivers.do3
-
-Mac driver download link: https://asa.atomstack.com/downloadMacDrivers.do3
- Check the baud rate:
-
AtomStack Studio does not require this setting to be checked.
-
When using LightBurn, make sure the baud rate is set to 460800 (see Figure 26).
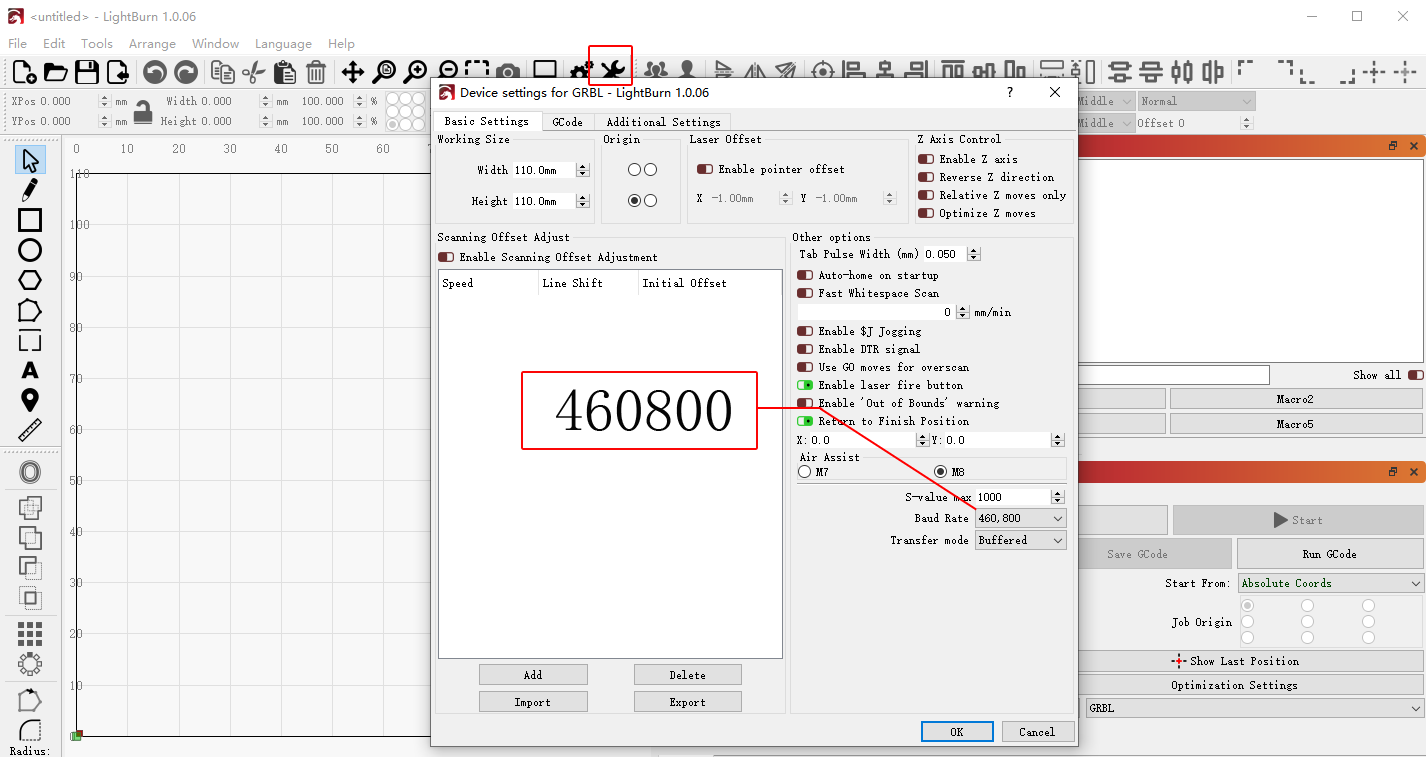
Figure 26
- Check the computer and software:
If possible, try connecting the machine using another computer to determine whether the connection works properly.
- If the issue still cannot be resolved after completing the above steps, please send a video showing the issue, the troubleshooting steps already performed, and the machine’s Serial Number (see Figure 27) to customer service for assistance.
Figure 27

For mainboard replacement instructions, please refer to the Master mainboard replacement video.
¶ Master’s Control Screen Has No Display After Powering On
- Confirm that the machine powers on normally:
Make sure you can hear the mainboard buzzer sound during startup and that the machine can be controlled normally when connected to a computer.
If the machine does not start properly, please refer to the “Master Cannot Power On Normally” section.
-
Check the status of the control panel: Carefully inspect whether the control panel has been damaged during transportation.
-
Check the mainboard cable connections:
Open the internal cover panel of the enclosure and check whether the control screen cable is loose (see Figure 28).
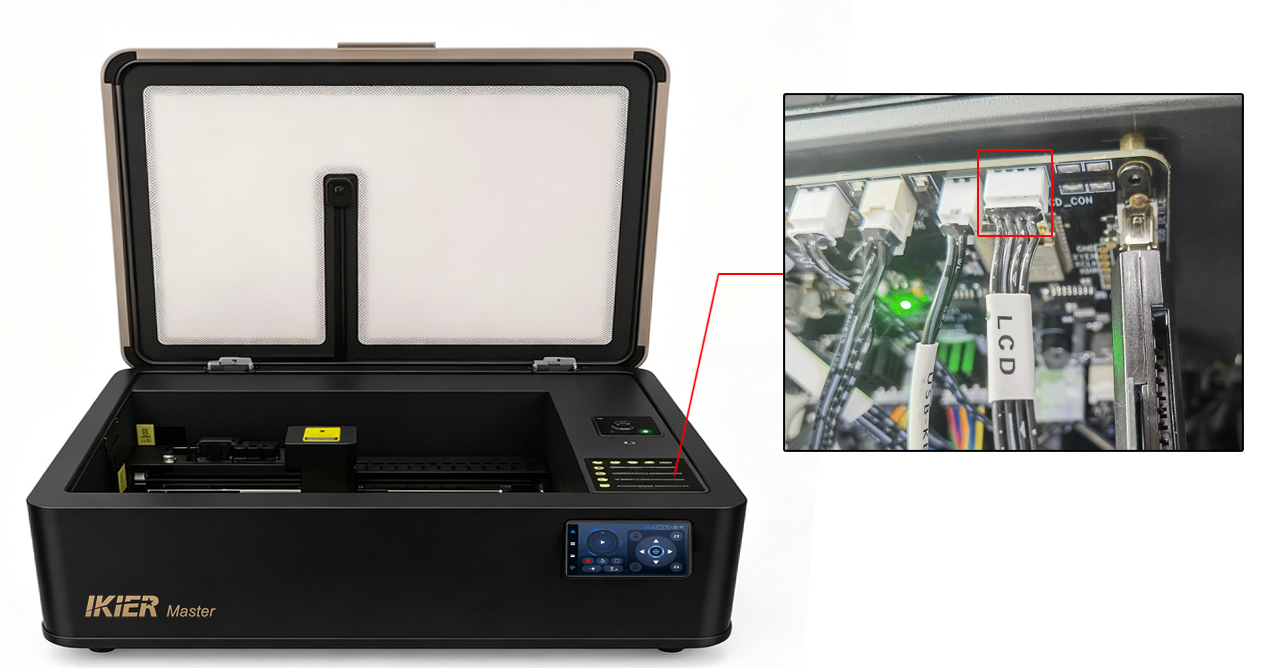
Figure 28
- Check the mainboard firmware version:
After connecting the machine, check the current firmware version in AtomStack Studio and send a screenshot to customer service so they can verify whether the firmware version is correct (see Figure 29).
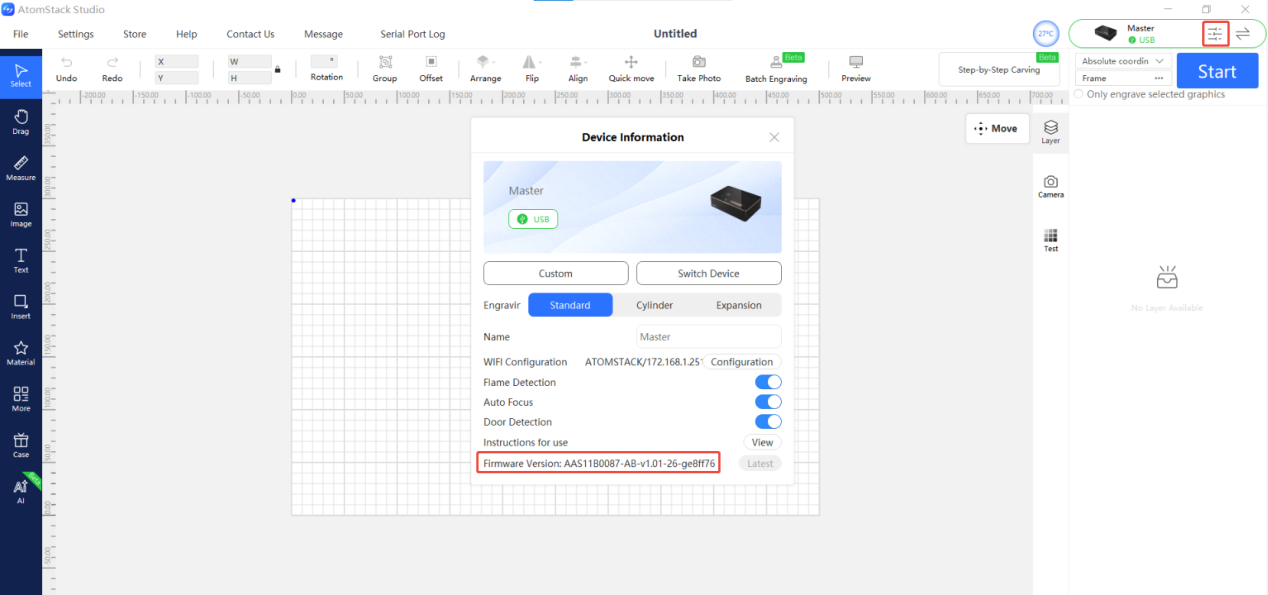
Figure 29
- If no issues are found after completing the above checks, the control screen may be faulty. Please send a video showing the issue, the troubleshooting steps already performed, and the machine’s Serial Number (see Figure 30) to customer service for assistance.
Figure 30

For control screen replacement instructions, please refer to the Master control screen replacement video.
¶ Master Cannot Detect the USB Drive
Solution: Please refer to the Master USB drive detection troubleshooting guide.
-
Remove and reinsert the USB drive, then restart the machine to check whether the USB drive can be detected.
-
Insert the USB drive into a computer and check whether it can be read normally.
-
Format the USB drive on a computer using the FAT32 file system.
-
Try using another USB drive with a capacity of 32 GB or less and check whether the machine can detect it automatically.
-
If the above steps do not resolve the issue, please send the following to customer service:
-
A video showing the issue
-
The troubleshooting steps already performed
-
A photo of the machine’s Serial Number (see Figure 83)
Figure 83
¶ Master Cannot Upgrade the Firmware

Solution: Please refer to the Master firmware upgrade troubleshooting guide.
- Confirm the firmware version:
Check the machine’s current firmware version in AtomStack Studio or the mobile app.
If the firmware name does not match the upgrade package, the firmware cannot be upgraded.
- Confirm that a USB drive is inserted:
A USB drive must be inserted into the machine during the firmware upgrade process, as it is used as the storage device.
- Confirm the firmware file format:
The firmware file must be in .bin format and must be placed in the root directory of the USB drive.
If you are upgrading by copying the firmware file to the USB drive manually, please make sure the file is not placed inside any folder.
- Confirm that the USB drive is functioning properly:
Insert the USB drive into a computer and check whether it can be read normally.
You can also export an NC or GC file from the software, copy it to the USB drive, insert the USB drive into the machine, and check on the control screen whether the file can be read correctly.